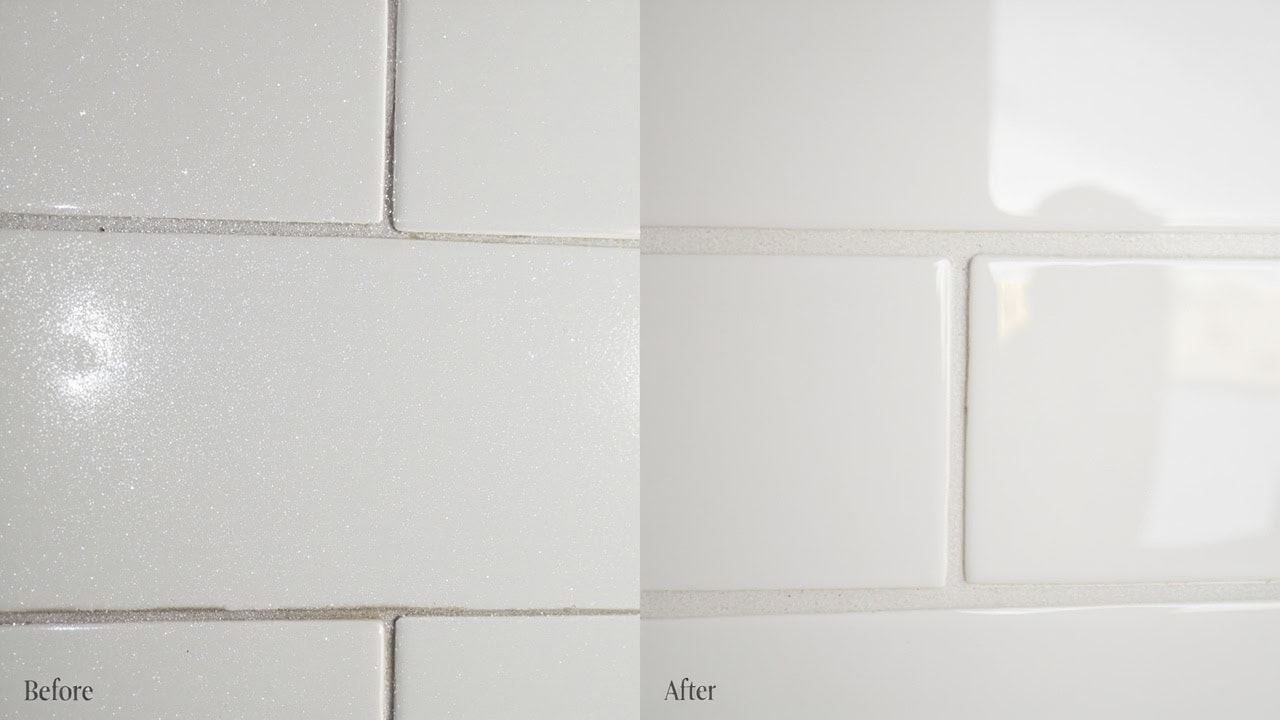
How to Remove Soap Scum from Tile and Grout
Soap scum deposits on tile and grout require an acidic cleaner with a pH between 2 and 4 for mineral-based soap residues, or a baking soda paste for light buildup, applied with 3–5 minutes dwell time before agitation. Grout lines demand a soft-bristled brush and sealing after cleaning to prevent future penetration — bleach-free formulas prevent grout degradation and fabric discoloration on nearby textiles.
What Is Soap Scum and Why It Bonds to Tile and Grout
Soap scum is a water-insoluble residue formed when the fatty acids in soap react with hard water minerals — primarily calcium and magnesium. This chemical reaction produces calcium fatty acid salts and magnesium fatty acid salts, which bond mechanically to tile and grout surfaces in ways that plain water and soap cannot reverse. The bond is chemical, not merely mechanical, which is why standard rinsing fails to remove established buildup.
On tile surfaces, mineral deposits accumulate within micro-pores and surface imperfections, creating a cloudy film that actually repels water — causing sheeting rather than beading — and giving the false impression of a “clean” surface when a dull residue remains. On grout lines, the problem is more severe. Cementitious grout is a highly porous material, and soap residue penetrates 2–3 mm below the surface, causing deep-set staining that becomes embedded rather than surface-level. Regular rinsing cannot reach these depths.
Bathroom humidity accelerates soap scum accumulation significantly. When surfaces remain perpetually damp during and after showering, mineral-soap reactions continue and the residue remains in a semi-soluble state that allows it to re-adhere more readily. In households with hard water (above 7 grains per gallon or 120 mg/L total dissolved solids), soap scum forms faster and requires more aggressive cleaning intervention.
What You Need Before Starting
| Tool/Product | Purpose | Notes |
|---|---|---|
| pH 2–4 acidic cleaner OR white vinegar (5% acetic acid) | Dissolves mineral soap residue | Never use on natural stone tiles (marble, travertine) |
| Baking soda paste (3:1 water to baking soda) | Mild abrasive for light buildup | Safe for all tile types |
| Soft-bristled scrub brush | Agitates grout lines without damage | Nylon or natural hair; avoid wire bristles |
| Spray bottle or bowl | Cleaner application | Ensures even coverage |
| Microfiber cloth or squeegee | Wiping and final rinse | Prevents streaking on tile faces |
| Grout sealer (if applicable) | Post-cleaning protection | Water-based penetrating sealer recommended |
| Protective gloves | Skin protection from acidic cleaners | Required for pH 2–4 commercial products |
Step-by-Step Soap Scum Removal Process
Follow this six-step process for complete soap scum removal from tile and grout surfaces. Each step builds on the previous one — skipping steps or reducing dwell time will compromise results, particularly on heavy buildup.
- Pre-rinse the surface with warm water to remove loose debris and surface-level soap film. Use a detachable showerhead or spray bottle set to a wide pattern. This removes unreacted soap residue and prevents you from grinding debris into grout lines during scrubbing.
- Apply acidic cleaner (pH 2–4 commercial product or undiluted white vinegar) generously to tile and grout, working from bottom to top to prevent cleaner from dripping onto already-treated areas and causing streaking. Undiluted white vinegar contains approximately 5% acetic acid by volume, giving it a pH of approximately 2.5 — strong enough to dissolve light mineral deposits but insufficient for heavy buildup.
- Allow 3–5 minutes dwell time — do not let the cleaner fully dry on the surface. Reapplication may be necessary for heavy buildup areas. If the cleaner begins to evaporate before the dwell time is complete, lightly mist with additional solution. Fully dried acidic cleaner leaves mineral residue (filming) that requires additional buffing to remove.
- Scrub grout lines with a soft-bristled brush using circular motions, applying moderate pressure to lift residue from the porous material. Nylon bristle brushes are preferred — natural hair brushes may degrade faster when exposed to acidic cleaners. Avoid wire bristles entirely; they gouge cementitious grout, creating micro-abrasions that accelerate future soap scum and stain adhesion.
- Wipe tile faces with a damp microfiber cloth or non-abrasive sponge, rinsing the cloth frequently to avoid redepositing residue. Microfiber’s split-loop structure traps soap residue effectively, but a saturated cloth will simply move residue around rather than remove it. Rinse under warm running water after every 2–3 passes.
- Rinse thoroughly with clean warm water, removing all cleaner residue to prevent streaking or filming. Use a squeegee on vertical tile surfaces to pull water downward in a single pass, preventing water from pooling in grout lines. Residue left behind from the cleaning solution — particularly from acidic cleaners — can cause a white mineral film (efflorescence) as it dries.
- Dry and inspect — squeegee tile surfaces and allow grout to air-dry completely before sealing. Do not apply grout sealer to damp grout; moisture trapped beneath the sealer creates an ideal environment for mold and bacteria growth and prevents proper sealer adhesion. A minimum of 24 hours air-drying is recommended before applying any sealer product.
Soap Scum Removal for Different Tile Types
Not all tile surfaces respond to the same cleaning approach. Using an acid-based cleaner on the wrong tile type can cause irreversible damage. Match your cleaner and technique to your tile material.
| Tile Type | Cleaner Recommendation | Scrub Method | Special Considerations |
|---|---|---|---|
| Ceramic / Porcelain | pH 2–4 acidic cleaner or undiluted white vinegar | Soft-bristled brush on grout; microfiber cloth on tile faces | Most resistant to acid damage among common household tiles |
| Glass Mosaic | pH 4–6 mild acid or baking soda paste | Soft cloth only — no brush on glass surfaces | Acid at pH 2–4 can etch glass over repeated exposure, causing hazing that is irreversible without professional polishing |
| Natural Stone (marble, travertine, limestone) | pH-neutral stone-specific cleaner only | Soft cloth with gentle pressure; no brush on stone | Acidic cleaners cause chemical etching — the surface becomes dull and requires professional repolishing to repair. Test any product on an inconspicuous area first. |
| Vinyl / Linoleum | Baking soda paste or pH-neutral cleaner | Soft cloth or non-abrasive sponge | Harsh acids at pH 2–4 can degrade the adhesive beneath sheet vinyl and peel tile edges, particularly at seams |
Product Comparison for Soap Scum Removal
Choosing the right product depends on your tile type, buildup severity, and whether you prefer commercial or DIY solutions. Each product category has distinct advantages and limitations.
| Product | pH Range | Best For | Limitations | Tile Safety |
|---|---|---|---|---|
| Commercial acidic cleaner (pH 2–4) | 2.0 – 4.0 | Heavy mineral-based soap scum, deep grout penetration | Requires gloves; can cause etching on stone | Ceramic, porcelain only |
| White vinegar (5% acetic acid) | ~2.5 | Light to moderate buildup; maintenance cleaning | Insufficient for thick mineral deposits; leaves residue if not rinsed thoroughly | Ceramic, porcelain; dilute for glass |
| Baking soda paste (3:1 ratio) | ~8.0 (slightly alkaline) | Light buildup; natural stone-safe alternative; cosmetic scrubbing | Not a chemical solvent — works mechanically; poor on heavy mineral deposits | All tile types including natural stone |
| pH-neutral stone cleaner | 6.5 – 7.5 | Natural stone tiles (marble, travertine); routine maintenance | Will not dissolve heavy mineral deposits; requires more dwell time and agitation | All natural stone types |
Common Mistakes When Removing Soap Scum from Tile and Grout
Avoiding these errors will save you from irreversible surface damage and repeated cleaning frustration. Each mistake is a documented failure mode in residential tile maintenance.
- Using vinegar alone on heavy buildup: Acetic acid at 5% concentration lacks the dissolving power required to break down thick mineral deposits formed over weeks or months. White vinegar is a maintenance product — it works on fresh, light buildup but cannot remediate established soap scum. Attempting to use it as a heavy-duty cleaner results in streaking and filming as the partially-dissolved residue dries back onto the surface.
- Using bleach on grout: Sodium hypochlorite (bleach) oxidizes the iron oxide pigments in cementitious grout, causing permanent and uneven lightening. Bleach also degrades the Portland cement binder that holds grout together — repeated use causes grout to become chalky, crumbly, and more porous over time. For whitening grout without damage, use oxygen bleach (sodium percarbonate), which is an alkaline-based oxidizer that brightens without destroying pigment or structure.
- Aggressive scrubbing on natural stone: Abrasive pads, stiff-bristled brushes, and powdered cleansers create micro-scratches on marble, travertine, and limestone that accelerate future soap scum adhesion. These scratches are too small to feel but are visible under light as a permanently dulled surface. Once scratched, natural stone requires professional grinding and repolishing to restore.
- Skipping grout sealing after cleaning: Cleaned grout is more susceptible to immediate re-soiling than dirty grout. During the cleaning process, pores in cementitious grout are opened as surface residue is removed. Unsealed grout reabsorbs soap residue within 2–4 weeks in high-humidity bathroom environments. Applying a penetrating grout sealer after cleaning closes these pores and restores the protective barrier.
- Using a single cleaner for all tile types: An acidic cleaner rated safe for ceramic and porcelain will cause permanent etching on marble, travertine, and limestone. These stones are calcium carbonate-based — acid reacts with calcium carbonate to produce carbon dioxide gas and water-soluble calcium salts, creating dull spots (etch marks) that cannot be buffed out and require professional repolishing.
How to Prevent Soap Scum Buildup on Tile and Grout
Prevention is significantly more effective than remediation. Soap scum prevention requires controlling the three factors that drive buildup: water film on surfaces, humidity levels, and surface porosity. These steps reduce the rate of accumulation by up to 80% when applied consistently.
- Squeegee after every shower: Using a squeegee to wipe down tile walls immediately after showering removes the water film that carries dissolved mineral-soap residue onto surfaces. Studies on bathroom cleaning frequency and soil accumulation rates indicate this single habit reduces soap scum buildup by approximately 80% in households with hard water. The key is mechanical removal of the water carrier, not just air drying.
- Apply dedicated soap scum preventers: Weekly spray-on hydrophobic barriers create a water-repellent coating that prevents mineral-soap particles from bonding to tile and grout surfaces. These products — typically silicone or polymer-based — work by making the surface too slick for residue to adhere. Reapplication is required weekly because the coating degrades with each shower exposure.
- Use liquid soap instead of bar soap: Bar soaps contain 30–40% fatty acid content by weight, which is precisely the component that reacts with hard water minerals to form soap scum. Liquid body washes and liquid castile soaps contain substantially less fatty acid (typically 5–15%) and include synthetic surfactants that remain soluble in hard water, producing significantly less residue.
- Ventilation matters: Running the exhaust fan during and for a minimum of 20 minutes after showering reduces relative humidity in the bathroom from near-100% to below 60%, which slows the chemical reaction rate between soap, minerals, and surfaces. In bathrooms without mechanical ventilation, opening a window 6–12 inches during and after showering provides equivalent humidity control.
- Seal grout annually: Cementitious grout should be sealed once per year in high-humidity bathrooms (showers, tub surrounds) and every 2–3 years in low-moisture areas (backsplashes, entry floors). Use a penetrating (impregnating) sealer rather than a membrane-forming sealer in shower environments — penetrating sealers allow moisture vapor to escape from the grout while blocking liquid water and oil-based substances. Apply to clean, dry grout only.
Drying and Finishing Tile and Grout
The final steps after cleaning are critical to achieving a streak-free result and preparing the surface for sealing. Rushing these steps undermines an otherwise thorough cleaning.
Allow cementitious grout to air-dry for a minimum of 24 hours before applying any sealer product. Applying sealer to damp grout traps moisture beneath the protective barrier, creating conditions for mold and bacterial growth and preventing the sealer from bonding properly to the grout surface. In humid bathrooms, a 48-hour drying window is preferable. Test grout dryness by pressing a paper towel against a grout line — if moisture transfers to the towel, wait longer before sealing.
Apply grout sealer with a small foam brush or specialty applicator bottle designed for grout lines. Work in sections of approximately 10 square feet at a time to prevent the sealer from drying before it can be wiped off tile faces. Wipe excess sealer from tile surfaces with a clean, lint-free cloth within 10–15 minutes of application — once sealer dries on tile faces, it produces a hazy film that requires mineral spirits or a dedicated sealer remover to correct.
Buff tile faces with a dry microfiber cloth after the final rinse and before drying to eliminate water spots and achieve a streak-free shine. Microfiber’s fine filaments absorb water and minerals without scratching glazed tile surfaces. After the final squeegee pass and air drying, a second buff with a dry microfiber cloth removes any remaining watermarks invisible during wet inspection.
Inspect grout lines carefully under good lighting for any remaining discoloration — grout lines that appear darker or uneven after cleaning still contain embedded residue requiring spot treatment. Reapply acidic cleaner directly to discolored spots, allow 3–5 minutes dwell, and scrub with a soft-bristled brush before rinsing. Do not apply grout sealer over visibly dirty or discolored grout.
Frequently Asked Questions
Q: Does vinegar remove soap scum from tile and grout?
A: Vinegar (5% acetic acid) removes light soap scum buildup but fails on heavy mineral deposits because its acidity is too weak (pH ~2.5) to fully dissolve calcium and magnesium compounds. For heavy buildup, use a commercial acidic cleaner with pH 2–4 or a baking soda paste followed by an acid rinse.
Q: Can I use bleach to clean soap scum off grout?
A: No — bleach oxidizes the pigments in grout causing permanent discoloration (grout appears faded or bleached) and weakens the structural integrity of cementitious grout. Instead, use oxygen bleach (sodium percarbonate) for whitening or acidic cleaners for soap scum removal.
Q: How do I clean soap scum from natural stone tile without damaging it?
A: Natural stone (marble, travertine, limestone) requires pH-neutral stone-specific cleaners only — acidic cleaners cause etching that creates dull spots and requires professional polishing to repair. Apply stone-safe cleaner, let dwell 2–3 minutes, wipe with soft cloth, and rinse with clean water.
Q: How often should I seal grout to prevent soap scum?
A: Cementitious grout should be sealed once annually in high-humidity bathrooms (showers, tubs) and every 2–3 years in low-moisture areas. Test grout sealer integrity by dropping water on the surface — if it beads up, the sealer is intact; if it absorbs immediately, reseal before soap scum treatment.
References
- Bob Vila. (2024). How to Remove Soap Scum. Bob Vila.
- Family Handyman. (2024). How to Remove Soap Scum. Family Handyman.
- Bob Vila. (2024). How to Seal Grout. Bob Vila.
- Merriam Park Plumbing. (2024). Why Does Soap Scum Form?. Merriam Park Plumbing.


