How to Re-caulk a Bathtub: Step-by-Step
Re-caulking a bathtub requires removing the old caulk completely, cleaning the surface with isopropyl alcohol to eliminate mildew and soap residue, applying 100% silicone caulk in a continuous bead, and allowing a full 24-hour cure time before water exposure. The process takes 45 minutes to 1 hour of active work plus 24 hours of curing time, and a properly sealed bathtub prevents water damage to the subfloor and surrounding walls. Silicone caulk outperforms latex for bathtub applications because it remains flexible after curing and resists mold growth in wet environments.
What You Need Before You Start
Before re-caulking a bathtub, gather the necessary tools and materials to ensure the job proceeds without interruptions. The primary materials include 100% silicone caulk (not latex or hybrid, as silicone provides the best waterproof seal and flexibility), a caulk removal tool or utility knife, and isopropyl alcohol at a minimum of 70% concentration for surface cleaning. Silicone sealants are resistant to temperatures ranging from −55°C to 300°C (−70°F to 570°F), making them suitable for the thermal cycling that occurs in bathrooms.
Additional supplies needed include painter’s tape for creating clean lines, a caulk gun, plastic sheeting or trash bags for debris collection, and rubber gloves to protect hands during application. Choose a silicone caulk specifically formulated for bathroom use, which should contain mildewcide to resist future mold growth. The mildewcide additive is critical — ASTM C920 standard sealants for sanitary applications include specifications for mold resistance in wet environments. Condensation-cure silicone sealants are particularly effective as sealants and caulks in plumbing and building construction because they cure by reacting with atmospheric moisture to form a tough, flexible rubber.
For stubborn old caulk removal, commercial caulk remover products require a minimum dwell time of 4 hours for proper softening before attempting removal. Keep a hairdryer set to low heat on standby for accelerating surface drying in humid conditions.
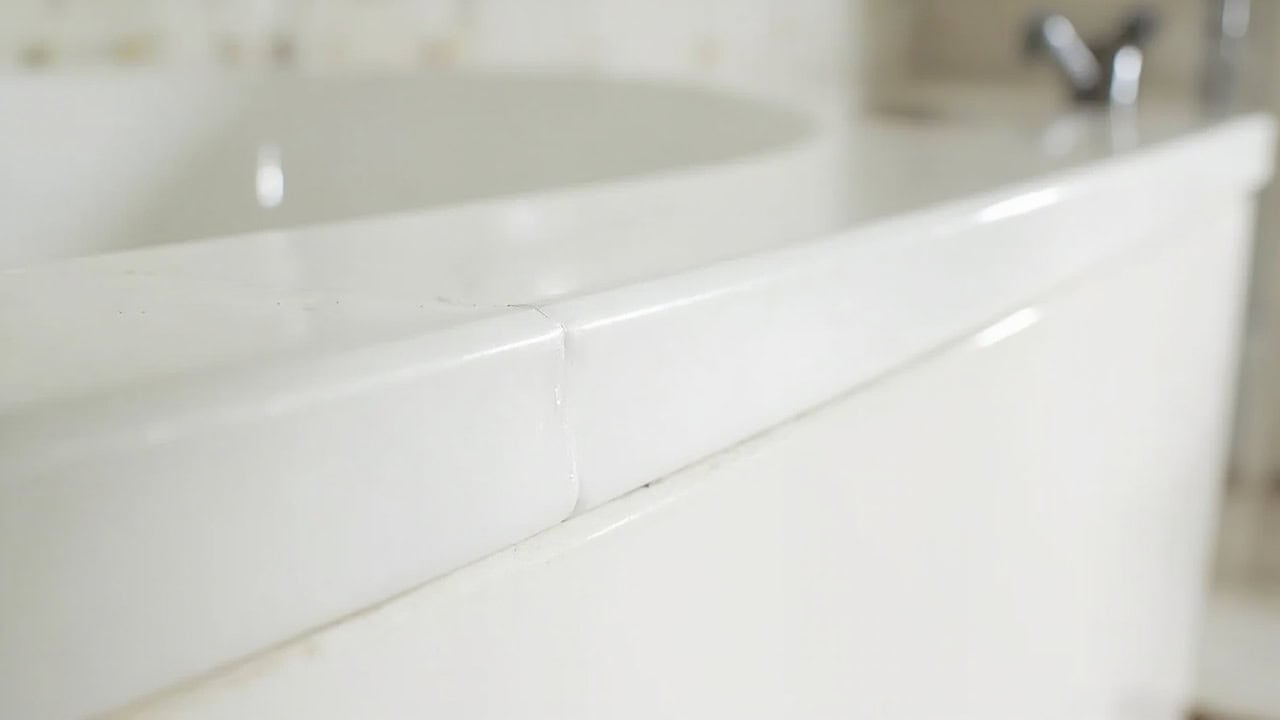
Step 1: Remove the Old Caulk
Begin by cutting along both edges of the existing caulk line with a utility knife to loosen its bond with the bathtub surface and the adjacent wall material. Insert a caulk removal tool or putty knife beneath the loosened caulk and pull it away from the joint at a slow, consistent pace to avoid damaging the bathtub finish or wall tiles. For stubborn caulk that adheres strongly, apply a commercial caulk remover product and allow it to penetrate for the manufacturer-recommended dwell time — typically a minimum of 4 hours — before attempting removal.
Remove all traces of the old caulk completely — any remaining residue will prevent the new caulk from bonding properly and create an uneven seal. For particularly stubborn residue that resists mechanical removal, apply isopropyl alcohol-soaked rags and allow them to sit for several hours to soften the remaining material, or use a hairdryer on low heat to warm the caulk slightly, making it more pliable for scraping. Place all removed caulk debris immediately into a trash bag to keep the work area clear.
Step 2: Clean and Dry the Surface
Once all old caulk is removed, clean the joint gap and surrounding surfaces with isopropyl alcohol applied at 70% concentration or higher to a clean microfiber cloth. This concentration is optimal because it evaporates slowly enough to dissolve oils and residue while leaving minimal moisture behind. Isopropyl alcohol at 70% concentration provides the best balance between cleaning power and surface drying — higher concentrations evaporate too quickly and leave more residue, while lower concentrations contain excessive water that can interfere with adhesion. The cleaning step eliminates soap residue, mildew spores, and any remaining caulk residue that could compromise the new seal.
For areas with visible mold growth, use a solution of baking soda and water applied with a scrub brush before the alcohol wipe-down to ensure biological contamination is fully removed. Alternatively, a diluted bleach solution (one part bleach to ten parts water) effectively kills mold and mildew spores on hard surfaces. After treating with either method, rinse the area with clean water and dry completely with a fresh cloth — moisture beneath the new caulk will cause adhesion failure and mold development within weeks.
Allow the surface to air-dry for a minimum of 30 minutes, or use a hairdryer on low heat to accelerate drying in humid bathrooms. The joint must be completely free of moisture and contaminants before proceeding. Test the dryness by pressing a piece of tissue paper against the joint — if it shows any moisture, continue drying until the surface passes this test.
Step 3: Apply Painter’s Tape for Clean Lines
Apply painter’s tape along both edges of the joint where the new caulk will be applied, leaving a consistent gap of approximately 1/4 inch (6mm) between the tape strips for the caulk bead. Press the tape down firmly along its entire length to prevent caulk from seeping beneath the edges and creating an irregular line. This step is optional but highly recommended for DIY applicators, as it significantly improves the precision of the finished caulk line.
Ensure the tape is straight and properly aligned — any deviation will transfer directly to the caulk application. For best results, apply the tape in long, continuous strips rather than multiple short pieces, which can create visible seams. Remove the tape immediately after smoothing the caulk (before it skins over), typically within 5 minutes of application. Pull the tape away at a 45-degree angle away from the bead to avoid pulling the caulk with it.
Step 4: Apply the New Silicone Caulk
Cut the tip of the caulk tube at a 45-degree angle to the wall at approximately 1/4 inch from the tip opening for a 1/4-inch caulk bead. Load the tube into the caulk gun and apply steady pressure on the trigger while moving the gun along the joint at a consistent pace — too fast produces a thin, inadequate bead, while too slow deposits excess caulk that requires more smoothing work. Maintain the caulk gun at a 45-degree angle to the surface for optimal bead formation and control.
Fill the entire joint in one continuous motion without stopping — gaps or seams in the bead will create leak paths that defeat the purpose of re-caulking. For corners and complex areas, apply the caulk by hand using a gloved finger to work it thoroughly into the joint. Condensation-cure silicone caulk reacts with atmospheric moisture to cure, so working in a well-ventilated bathroom actually supports proper curing rather than hindering it. The silicone forms a tough, flexible rubber that remains permanently flexible after curing, accommodating the subtle movement that occurs as bathtubs fill and empty.
Step 5: Smooth the Caulk Bead
Immediately after application (within 2–5 minutes before the caulk skins over), smooth the caulk bead using a caulk finishing tool or a gloved finger dipped in water with a small amount of dish soap to prevent sticking. Draw the tool or finger along the entire length of the caulk line with steady, even pressure to create a concave profile that sheds water effectively. The concave shape is essential — it directs water away from the joint rather than allowing pooling that could eventually penetrate the seal.
Work from one end to the other without lifting and restarting, which creates visible seams in the finished bead. The smoothing step presses the caulk firmly against the joint surfaces, eliminating air gaps and ensuring proper adhesion along the full length. Wipe excess caulk from the tool or glove frequently with a clean cloth to prevent spreading residue across the bathtub surface. If using a finishing tool, clean it between passes to maintain a consistently smooth result.
Step 6: Allow Proper Cure Time
Remove the painter’s tape immediately after smoothing the caulk, pulling it away at a 45-degree angle away from the bead to avoid pulling the caulk with it. Allow the caulk to cure undisturbed for a minimum of 24 hours before exposing it to any water or moisture — this cure time is critical for the silicone to reach its full waterproof properties. The skin formation that occurs within the first few hours can be deceiving — the caulk may feel dry to the touch while the deeper layers are still curing. Exposing the seal to water before full cure creates weak spots in the silicone structure that will fail prematurely.
During the curing period, keep the bathroom well-ventilated but avoid direct airflow onto the caulk, which can cause uneven curing and surface skinning. Maintain bathroom temperature above 65°F (18°C) if possible — cooler temperatures slow the condensation cure reaction significantly. In high-humidity environments or if the bathroom temperature falls below 65°F (18°C), extend the cure time to 48 hours to ensure the caulk reaches its full waterproof properties. Silicone sealants maintain their elastic properties across a broad temperature range from −55°C to 300°C, so once cured, the seal will handle temperature fluctuations without cracking or pulling away.
Test the seal by applying a small amount of water to the area after the minimum cure time — the water should bead up and not penetrate the caulk. If water absorbs into or passes through any section of the caulk, the seal has failed and re-application is necessary.
Bathtub-Specific Considerations
Acrylic and fiberglass bathtubs require special caution during caulk removal — avoid using sharp metal tools that could scratch the surface. Use plastic scrapers or a wooden popsicle stick instead of utility knives or metal putty knives on these materials. Acrylic tubs also have more flex than porcelain-enameled cast iron or steel tubs, so they benefit from a silicone caulk specifically formulated for high-movement applications. Marine-grade silicone sealants are designed to tolerate the greater flex and movement that occurs in acrylic installations and can accommodate movement up to 50% without cracking.
If your bathtub sits on a wooden frame or shows any flex when weight is applied, consider using a flexible silicone caulk specifically formulated for marine or automotive applications. These products are engineered to tolerate more movement than standard bathroom sealants while maintaining a watertight seal. The extra flexibility prevents the caulk from tearing away from the joint surfaces when the tub flexes during use.
Common Mistakes When Re-caulking a Bathtub
- Moisture before application: Applying caulk in a bathroom that has not fully dried after cleaning introduces moisture beneath the seal, leading to adhesion failure and mold growth within weeks. The isopropyl alcohol cleaning step leaves minimal residue, but any remaining moisture must evaporate completely before application.
- Wrong caulk type: Using latex-based or acrylic caulk products in wet environments results in premature degradation and water leaks. Latex and acrylic caulks absorb water over time, support mold growth, and require replacement more frequently than silicone. “Siliconized” acrylic caulk is not the same as 100% silicone — it offers improved flexibility but lacks the water resistance required for bathtub applications.
- Bob Vila. (n.d.). How to Remove Caulk. Bob Vila.
- ScienceDirect. (n.d.). Silicone Sealant. Elsevier ScienceDirect.
How to Know When to Re-caulk
Visible mold or mildew growth along the caulk line even after thorough cleaning indicates that the caulk has reached the end of its serviceable life. Discoloration at the edges of the caulk, particularly yellowing or browning, signals oxidation and material degradation. Cracking or gaps appearing in the caulk bead — whether visible separation from one or both surfaces or fractures running through the bead itself — require immediate re-caulking to prevent water penetration.
Water pooling outside the tub during use is a definitive sign the seal has failed. More serious indicators include water stains on the ceiling below the bathroom (signifying water is penetrating the floor assembly), soft spots in the flooring near the tub, or a musty odor emanating from wall cavities. These symptoms indicate prolonged water exposure has already caused damage that extends beyond the caulk itself and may require floor or wall repair in addition to re-caulking.
A properly applied silicone caulk seal in a bathtub should last 5 to 10 years before requiring replacement, though this varies based on bathroom humidity levels, ventilation quality, and usage frequency. Inspect the caulk annually for signs of wear, discoloration, or separation, and re-caulk immediately if any of these indicators appear. Higher-use bathrooms in multi-person households may require re-caulking more frequently than guest bathrooms used only occasionally.
Frequently Asked Questions
Q: How often should you re-caulk a bathtub?
A: A properly applied silicone caulk seal in a bathtub should last 5 to 10 years before requiring replacement, though this varies based on bathroom humidity levels, ventilation quality, and usage frequency. Inspect the caulk annually for signs of wear, discoloration, or separation, and re-caulk immediately if any of these indicators appear. Higher-use bathrooms (such as in multi-person households) may require re-caulking more frequently than guest bathrooms used occasionally.
Q: Can I apply new caulk over old caulk?
A: No, applying new caulk directly over existing caulk is not recommended and will result in premature failure of the new seal. The new caulk cannot properly bond to the surface of cured silicone, causing it to peel away within months. Always remove the old caulk completely before applying fresh caulk, regardless of how intact the existing caulk appears.
Q: What type of caulk is best for bathtubs?
A: 100% silicone caulk is the best choice for bathtub applications because it remains permanently flexible after curing, resists mold growth, and maintains its waterproof seal even when exposed to standing water. Choose a silicone caulk specifically labeled for bathroom or kitchen use, which contains mildewcide additives that inhibit mold growth on the caulk surface. Avoid latex, acrylic, or “siliconized” caulk products, as these materials degrade faster in wet environments.
Q: How long does silicone caulk take to cure in a bathtub?
A: Silicone caulk requires a minimum of 24 hours to cure fully in a bathtub application, though tackiness may disappear within a few hours. In humid conditions or cooler temperatures below 65°F (18°C), extend the cure time to 48 hours to ensure the caulk reaches its full waterproof properties. Premature water exposure during curing causes the caulk to cure improperly and creates weak spots in the seal that will fail early.


