How to Clean Bathroom Caulk: Remove Mold and Mildew
How to Clean Bathroom Caulk: Remove Mold and Mildew
Bathroom caulk mold and mildew must be cleaned with a 10% bleach solution (1 part household sodium hypochlorite bleach to 9 parts warm water) applied for 5–10 minutes of dwell time before scrubbing — this dissolves the organic growth and sanitizes the porous surface to prevent rapid regrowth. The key to long-lasting results is eliminating moisture at the seal edges where water infiltrates and feeds residual spores. Regular cleaning every 3–4 weeks combined with bathroom ventilation prevents future buildup without damaging the caulk’s flexible waterproof barrier.
Mold on bathroom caulk is one of the most persistent household cleaning challenges because standard surface cleaners cannot penetrate the microscopic pores where mold anchors its root structures. According to the Environmental Protection Agency, indoor bathroom mold growth begins within 24–48 hours when moisture levels remain elevated on porous surfaces. The 10% sodium hypochlorite solution addresses this by oxidizing mold cell walls at the molecular level, killing both surface growth and embedded spores that soap-based cleaners leave behind.
What You Need Before You Start
Gathering the correct tools and cleaning agents before starting ensures the mold removal process is both effective and safe. Using the wrong scrubbing tool or bleach concentration can permanently damage caulk, creating more places for mold to colonize.
Tools Required
- Old toothbrush or soft-bristle scrub brush
- Spray bottle or small bowl
- Rubber gloves — nitrile, neoprene, or natural rubber (bleach-resistant)
- Safety goggles
- Old cloth or paper towels
- Bathroom exhaust fan or open window
Cleaning Agents
- Household bleach (sodium hypochlorite 5–6% concentration)
- Warm water (75–85°F / 24–29°C)
- White vinegar (5% acetic acid, for post-bleach neutralizing rinse)
The critical dilution ratio is 1 part bleach to 9 parts water, producing a 10% working solution. This concentration is strong enough to oxidize mold cellular structures while remaining safe for silicone and latex caulk. Household bleach at full strength (5–6% sodium hypochlorite) is too aggressive — it degrades caulk elasticity, causes yellowing, and shortens the seal’s lifespan. Warm water between 75–85°F (24–29°C) increases the bleaching reaction rate by approximately 40% compared to cold tap water without accelerating chlorine off-gassing.
The EPA recommends wearing protective gloves made from natural rubber, neoprene, nitrile, polyurethane, or PVC when handling bleach solutions, along with goggles to prevent eye exposure from splashing. Never mix bleach with ammonia-based cleaners or acidic products — this produces toxic chloramine gas. Ensure the bathroom has active ventilation before opening the bleach container.
Step-by-Step Cleaning Process
- Prepare the area — Open bathroom windows and turn on the exhaust fan to ensure proper ventilation throughout the entire cleaning process. Lay down old towels along the bathtub or shower floor to catch drips and protect surfaces from bleach splashes. Remove any shampoo bottles, soap dishes, or accessories near the caulk lines to give yourself unobstructed access.
- Mix the cleaning solution — Combine 1 part household bleach with 9 parts warm water in a spray bottle or bowl. For a standard spray bottle (16 oz / 475 mL), use roughly 1.6 oz (47 mL) of bleach to 14.4 oz (428 mL) of warm water. Warm water at 75–85°F (24–29°C) increases bleaching efficiency by approximately 40% compared to cold water, as the elevated temperature accelerates the oxidation reaction of sodium hypochlorite against organic mold structures.
- Apply the bleach solution — Generously spray or dab the 10% bleach solution directly onto the moldy caulk. Ensure complete saturation of every affected area, including sections where discoloration appears faint — mold hyphae often extend beyond visible staining. For vertical caulk lines along shower walls, a spray bottle provides better coverage than dabbing with a cloth.
- Allow dwell time — Let the solution sit for 5–10 minutes without rinsing or scrubbing. This dwell time is essential: sodium hypochlorite (NaOCl) oxidizes the mold’s cellular structure by breaking disulfide bonds in proteins and disrupting cell membrane integrity. The hypochlorous acid formed when NaOCl contacts water penetrates the microscopic pores of the caulk material, reaching embedded spore structures that surface contact alone cannot address. Insufficient dwell time is the single most common reason mold returns within days of cleaning.
- Scrub thoroughly — Using an old toothbrush or soft-bristle nylon brush, scrub the caulk in circular motions with moderate pressure. Work along the entire length of the caulk line, paying extra attention to corners, edges, and joints where mold congregates. The mechanical action of scrubbing dislodges the oxidized organic matter and dead spore material from the caulk surface. Replace the toothbrush if bristles become frayed, as worn bristles lose scrubbing effectiveness.
- Rinse with vinegar solution — Mix equal parts white vinegar (5% acetic acid, pH ~2.5) and water. Apply this solution to the caulk to neutralize residual sodium hypochlorite. This step matters because bleach residue left on silicone caulk continues to break down the polymer chains over time, causing brittleness and cracking. The vinegar’s acetic acid reacts with remaining hypochlorite, converting it to harmless chloride salts and water. Wipe away the rinse with a damp cloth.
- Dry completely — Use a clean, dry cloth or paper towels to dry the caulk thoroughly. Any moisture remaining in or on the caulk creates conditions for new mold growth within 24–48 hours. The EPA emphasizes that the key to mold control is moisture control — surfaces must be dried promptly and kept dry.
- Seal and protect — Once the caulk is completely dry to the touch, inspect the seal for cracks, gaps, or peeling sections. Apply a thin bead of fresh 100% silicone caulk over any areas showing deterioration. Silicone caulk requires 24 hours to fully cure — keep the area dry during this period. This step is critical because gaps and cracks allow water to infiltrate behind the caulk, creating the moisture reservoir that fuels mold regrowth.
Bathroom Caulk-Specific Considerations
What to Avoid
- Abrasive scrubbers (steel wool, scouring pads) — These create microscopic tears in the caulk surface where mold spores colonize and anchor. Even fine-grit scouring pads produce abrasions invisible to the naked eye that dramatically increase the surface area available for mold attachment.
- Vinegar alone on silicone caulk — While vinegar (pH 2.5) kills some surface mold species, prolonged or repeated application of acetic acid degrades silicone polymer chains over time. This causes cracking, loss of elasticity, and premature seal failure. Use vinegar only as a post-bleach rinse, not as a standalone mold treatment on silicone.
- Bleach concentrations above 15% — Concentrated bleach solutions dissolve the caulk’s surface layer, causing brittleness, yellowing, and shrinkage. The 10% working solution provides maximum mold-killing effectiveness without damaging the seal material.
- Hot water above 85°F (29°C) with bleach — Water temperatures exceeding 85°F accelerate chlorine off-gassing, reducing the effective dwell time and releasing irritating vapors. Keep mixing water between 75–85°F for optimal safety and effectiveness.
Why Mold Grows on Caulk
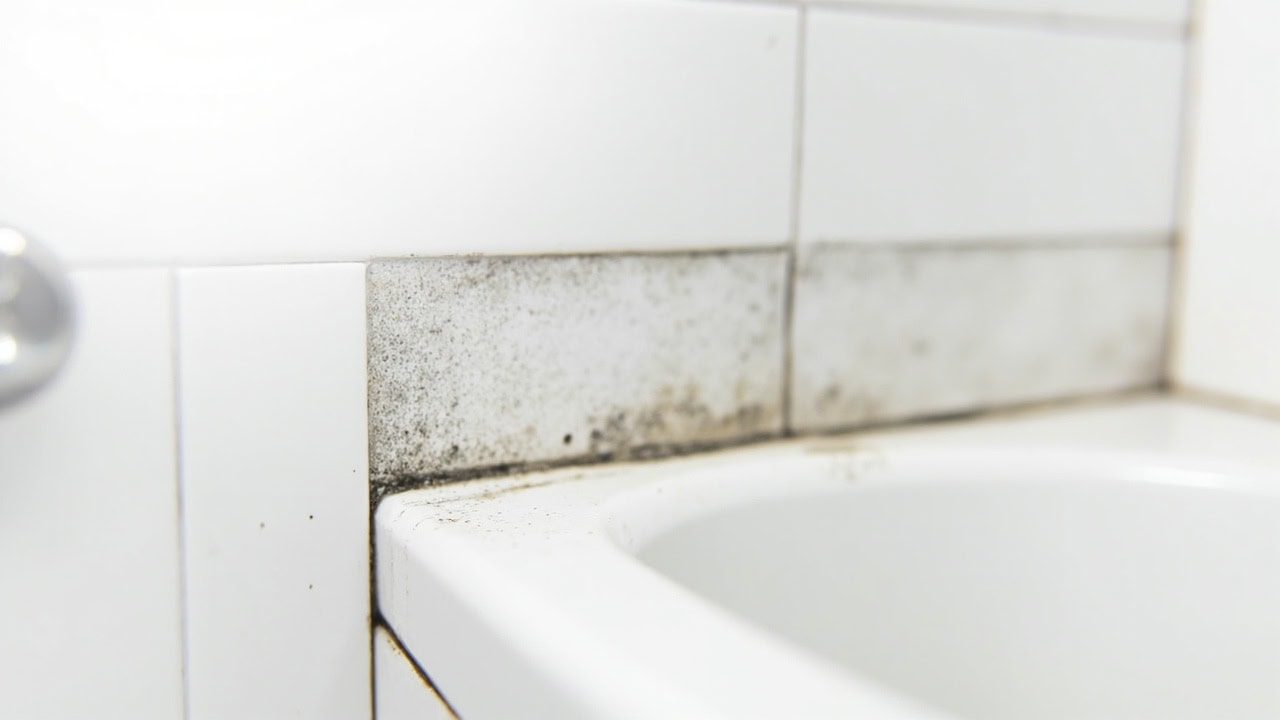
Bathroom caulk — whether silicone or latex-based — is porous at the microscopic level. When water infiltrates behind or beneath the caulk seal through cracks, gaps, or aging deterioration, it creates a perpetual moisture reservoir that never fully dries between showers. Combined with the warmth of the bathroom environment and a steady supply of organic matter (soap scum, dead skin cells, body oils), this creates ideal conditions for mold spore germination.
Mold spores, ever-present in indoor air, land on the damp caulk surface and germinate within 24–48 hours when relative humidity exceeds 60%. The spores produce root-like structures called hyphae that anchor into the caulk’s microscopic pores, making surface-only cleaning insufficient. These hyphae secrete enzymes that break down organic material for food, and the colony produces the characteristic black, green, or pink discoloration visible on the caulk. Mold cannot grow on completely dry, sealed surfaces — moisture control is the foundational requirement for prevention.
This same biology applies to other bathroom surfaces. If you are dealing with mold on tile grout, the underlying mechanism is identical, though grout’s higher porosity requires slightly different treatment. For shower door cleaning, hard water minerals create a complementary problem that often coexists with caulk mold.
Drying and Finishing
Proper drying is the most critical yet overlooked step in caulk maintenance. The CDC and EPA both emphasize that drying surfaces completely within 24–48 hours is essential to preventing mold from returning. After cleaning your bathroom caulk, the following drying protocol ensures the mold does not re-establish immediately:
- Run the bathroom exhaust fan for a minimum of 30 minutes post-cleaning to evacuate moisture-laden air. The fan should achieve at least 1 CFM per square foot of bathroom floor area, per the Home Ventilating Institute standard.
- Keep the shower or tub area dry for 4–6 hours after cleaning. Avoid running the shower during this period to allow the caulk to release all trapped moisture.
- Wipe the caulk with a dry cloth after each shower for the first week following treatment. This removes surface moisture before it can penetrate the caulk pores and feed any surviving spores.
- Apply a caulk sealer product every 6–12 months to restore the waterproof barrier on the caulk surface. Sealers fill microscopic pores that develop through normal aging, denying mold the texture it needs to anchor.
Common Mistakes When Cleaning Bathroom Caulk
| Mistake | Why It Causes Problems | Correct Approach |
|---|---|---|
| Rinsing bleach off immediately | Zero dwell time leaves surface spores alive; mold returns within days | Wait 5–10 minutes before scrubbing |
| Using undiluted bleach | Degrades caulk elasticity and causes yellowing | Always dilute to 10% solution (1:9 ratio) |
| Scrubbing with abrasive pads | Creates micro-abrasions that trap spores and accelerate mold return | Use soft toothbrush or nylon brush only |
| Ignoring underlying moisture | Mold returns repeatedly because water still infiltrates behind the seal | Find and seal water infiltration points; recaulk if needed |
| Cleaning with dish soap alone | Leaves behind organic residue that serves as a food source for mold | Use bleach solution to fully sanitize porous surfaces |
The most frequent mistake is insufficient dwell time. Without the full 5–10 minute contact period, sodium hypochlorite cannot penetrate the caulk’s porous structure to reach embedded mold hyphae. The second most common error is neglecting the underlying moisture source — even perfectly executed cleaning will fail if water continues to infiltrate behind the caulk through cracks or gaps. These principles of proper dilution and surface-appropriate technique also apply in other cleaning contexts; the kitchen cleaning guide covers similar pH-neutral and dilution principles for food-safe surfaces.
How to Prevent Future Caulk Mold Buildup
- Improve ventilation — Run the exhaust fan during every shower and for 20–30 minutes afterward. The EPA recommends maintaining indoor humidity between 30–50% and no higher than 60% to prevent mold growth. A bathroom hygrometer ($10–15) lets you monitor humidity levels objectively. If your fan does not clear steam within 10 minutes, consider upgrading to a unit rated for your bathroom’s square footage.
- Squeegee shower walls — Remove standing water from tile and caulk surfaces after each use. A quick 30-second squeegee pass eliminates the water film that mold spores need to germinate. This single habit reduces visible mold growth by preventing the moisture contact window that triggers spore activation.
- Weekly maintenance spray — Apply a 50/50 vinegar-water solution to caulk lines once per week. This maintains a slightly acidic surface environment (pH ~4) that inhibits mold spore germination without the harshness of bleach. Spray lightly, wait 5 minutes, and rinse with water.
- Monthly deep clean — Apply the 10% bleach solution monthly even without visible mold as preventive maintenance. This kills spores before they establish visible colonies and prevents hyphae from penetrating deeper into the caulk material. Prevention requires a fraction of the effort compared to removing established mold growth.
- Inspect caulk condition regularly — Replace any cracked, peeling, or shrinking caulk immediately. Damaged caulk cannot be cleaned effectively because water infiltrates behind the seal where cleaning solutions cannot reach. Once caulk shows signs of deterioration, removal and reapplication is the only permanent solution. Properly applied 100% silicone caulk lasts 10–20 years in bathroom environments; latex caulk typically lasts 5–10 years.
Frequently Asked Questions
Q: Can I use vinegar instead of bleach to clean bathroom caulk mold?
A: Vinegar alone is less effective than bleach on porous caulk because it lacks the strong oxidizing power needed to kill mold roots embedded in the material. Vinegar (5% acetic acid at pH 2.5) kills some surface mold on non-porous surfaces but cannot penetrate the microscopic pores of silicone or latex caulk where hyphae anchor. Use a 10% bleach solution for active mold removal, then vinegar as a post-clean rinse to neutralize bleach residues and maintain an acidic surface environment hostile to mold regrowth.
Q: How often should I clean the bathroom caulk to prevent mold?
A: Clean visible mold on bathroom caulk every 3–4 weeks with the 10% bleach solution method, and apply a preventive vinegar-water spray weekly. With consistent ventilation and drying practices — running the exhaust fan 20–30 minutes after each shower and squeegeeing walls — this schedule prevents mold from regrowing between cleanings.
Q: Will cleaning with bleach damage or discolor my white caulk?
A: Properly diluted 10% bleach solution will not damage white latex or silicone caulk when used as directed with 5–10 minute dwell time followed by a vinegar rinse. Undiluted bleach or concentrations above 15% can cause yellowing, brittleness, and premature cracking by degrading the polymer structure of the caulk material.
Q: When should I replace bathroom caulk instead of cleaning it?
A: Replace bathroom caulk when it shows signs of deterioration: cracking, shrinking away from surfaces, gaps allowing water infiltration, or persistent mold returning within days of thorough cleaning. If mold regrows immediately after a complete bleach treatment, the underlying moisture issue — typically water infiltrating behind the seal — must be resolved by removing the old caulk and applying a fresh bead of silicone.
References
- U.S. Environmental Protection Agency. (2024). Mold Cleanup in Your Home. EPA.gov.
- U.S. Environmental Protection Agency. (2024). A Brief Guide to Mold, Moisture, and Your Home. EPA.gov.
- Centers for Disease Control and Prevention. (2024). Mold Cleanup After Disasters. CDC.gov.
- Centers for Disease Control and Prevention. (2024). Mold — General Information: Cleanup. CDC.gov.


