
Why Is My Vacuum Losing Suction? Complete Diagnosis

Why Is My Vacuum Losing Suction? Complete Diagnosis
A vacuum loses suction when the airflow path is restricted, typically due to a clogged filter (accounting for 42% of suction loss cases), an overfilled dust bin breaking the air seal, or a blocked hose creating a complete airflow obstruction. The root cause is always something physically obstructing the air pathway from the brush roll to the exhaust port. Diagnosing which component is failing requires checking each segment of the airflow circuit in sequence, starting at the intake and moving toward the exhaust.
What Causes Vacuum Suction Loss?
Airflow restriction is the universal cause of suction loss in every vacuum cleaner design. Whether the vacuum is bagged or bagless, canister or upright, the physics remain identical: the motor spins a fan that creates a pressure differential, and air must flow continuously from the intake through the filtration system to the exhaust. Any interruption in this airflow circuit translates directly to lost suction at the brush roll.
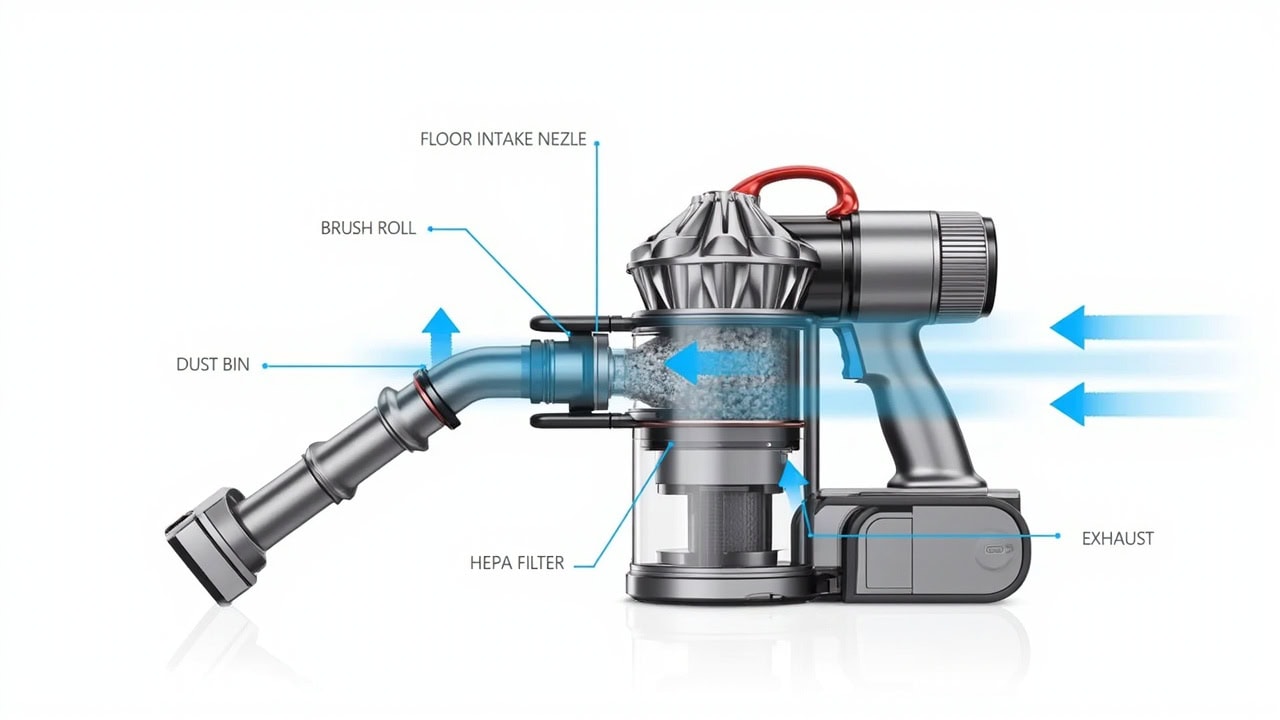
The vacuum airflow circuit has four distinct failure points: the intake (brush roll and floor nozzle), the dust bin (cyclonic separation chamber), the filtration system (pre-motor and HEPA filters), and the exhaust port. Each failure point produces recognizable suction symptoms, and understanding which component is failing is the first step toward a repair. Clogged filters account for 42% of suction loss cases in consumer vacuums, making them the single most common cause of diminished performance. Full dust bins reduce cyclone efficiency and physically block air passage, while hose collapses or severe bends create total airflow blockage that stops pickup entirely.
The Vacuum Airflow Circuit Explained
Understanding the airflow circuit helps diagnose where suction loss is occurring. Air enters the vacuum through the brush roll or floor nozzle, where the rotating bristles loosen debris from carpet fibers and the pressure differential lifts particles into the air stream. From there, the dirty air stream passes through cyclonic separation in the dust bin, where centrifugal force spins debris outward against the bin walls while clean air rises toward the center.
After the dust bin, airflow moves through the pre-motor filter, which captures larger debris particles that escaped the cyclone. This filter protects the motor from damage and extends its lifespan. Finally, the air passes through the post-motor HEPA filter before exiting the exhaust port. The HEPA filter captures 99.97% of particles ≥0.3 microns in size — including dust, pollen, mold spores, bacteria, and pet dander — releasing clean air back into the room. Any restriction in this chain reduces suction proportionally, and the cumulative effect of multiple partial blockages can eliminate pickup entirely.
Diagnosis Checklist: Finding the Source of Suction Loss
- Run vacuum on bare floor — no attachment tools connected
- Check if suction improves with bare floor setting engaged
- If yes, the blockage is located in the attachment or hose
- If no, remove and inspect the dust bin for overfilling or debris buildup
- Check filter condition — hold each filter up to light to detect light passage blockage
- Remove and inspect the hose for kinks, collapses, or lodged debris
- Examine the brush roll for tangled hair, carpet fibers, or string wrapped around the axle
- Check the exhaust vent for obstructions such as accumulated dust or foreign objects
Common Cause 1: Clogged Filters
Clogged filters are the leading cause of vacuum suction loss, responsible for 42% of all reported performance failures. The pre-motor filter captures large debris particles before they reach the motor, while the post-motor HEPA filter captures fine particles down to 0.3 microns. Over time, both filters accumulate trapped debris that progressively restricts airflow until suction diminishes noticeably.
Pre-motor filters are typically constructed from foam or pleated fabric and may be washable, depending on the vacuum model. HEPA filters, defined by the U.S. Department of Energy as removing a minimum of 99.97% of particles ≥0.3 microns, are usually non-washable and must be replaced when spent. Non-washable HEPA filters lose their electrostatic charge when exposed to water, actually performing worse after washing than before. Foam pre-motor filters should be cleaned every 3 months and replaced every 6–12 months. HEPA filters should be replaced every 6–12 months depending on usage frequency, with heavy-use households requiring replacement at the shorter interval.
Visible darkening, caked dust, or the inability to see light passing through the filter when held up to a window or lamp indicates replacement is needed. Some vacuum manufacturers include a filter condition indicator light, but the hold-to-light test remains the most reliable field assessment method.
Common Cause 2: Full or Improperly Seated Dust Bin
The dust bin serves two functions: collecting debris and maintaining the air seal that enables cyclone separation. Dust bins must click firmly into place to create a complete seal between the collection chamber and the airflow circuit. Most bins signal when capacity is reached through a full line marked on the bin interior, typically at 1.5–2 liters depending on the model. Some newer models include a dust bin misalignment indicator that illuminates when the bin is not seated properly.
Overfilling the dust bin causes debris to bypass the cyclone chamber entirely and coat the pre-motor filter, effectively doubling the filtration load and accelerating filter clogging. For optimal performance, empty the dust bin when it reaches 70% full rather than waiting for the maximum fill line. With bagged vacuums, replace bags when they reach 50–70% full to prevent the compressed debris from creating a complete airflow seal that stops suction entirely.
Common Cause 3: Blocked Hose or Attachment
Hose blockages cause total airflow obstruction and are among the easiest problems to diagnose — the vacuum will pick up nothing at all. Internal hose collapses occur when sharp bends or crushing pressure damage the corrugated interior wall, creating a flap that partially or completely blocks airflow. Attachments clog when pet hair, string, or embedded carpet fibers accumulate in the nozzle or extension wand.
To clear a blocked hose, disconnect it from both the vacuum body and the attachment wand. Use a long dowel rod or a straightened coat hanger with a small cloth attached to pull debris through the hose. Never use water to flush a vacuum hose unless the manufacturer explicitly approves water cleaning for that model — trapped moisture leads to mold growth, odor, and motor damage. Also inspect the wand extension tube for lodged debris, which is a common collection point for long fibers and string that accumulate during normal use.
Common Cause 4: Brush Roll Issues
The brush roll is the primary agitation mechanism that loosens debris from carpet fibers. Tangled hair, carpet fibers, and string accumulate around the brush roll axle and bristles, increasing rotational resistance until the brush roll slows or stops entirely. When the brush roll stops, agitation ceases and the vacuum can no longer lift embedded debris from carpet — a condition that feels like suction loss even though airflow may still be partially intact.
Belt failure is the second brush roll problem. The rubber drive belt connecting the motor to the brush roll stretches, cracks, or snaps over time. A failing belt produces a squealing or grinding noise when the vacuum is running, and the brush roll stops rotating completely. Check belt integrity by manually rotating the brush roll with the bottom access panel removed — if rotation is stiff or the belt appears cracked, stretched, or broken, replacement is required. Replace belts every 6–12 months in high-use households to prevent unexpected failure during cleaning.
How to Restore Vacuum Suction: Step-by-Step
- Unplug the vacuum from the electrical outlet and remove the dust bin
- Empty the dust bin completely outdoors and away from living spaces to avoid redistributing allergens
- Remove and inspect the pre-motor filter — tap loose debris against a hard surface or rinse if the filter is washable, then allow it to dry completely before reinstallation
- Locate and remove the HEPA post-motor filter — replace it if it is non-washable; do not attempt to clean non-washable HEPA filters with water
- Disconnect the hose from both the vacuum body and the attachment wand, then use a broomstick or straightened coat hanger to clear any obstructions from inside the hose
- Remove the brush roll cover and cut away tangled hair and fibers with scissors, working carefully around the axle and bristles
- Inspect the drive belt for cracks, stretching, or breakage — replace with a manufacturer-specified replacement belt if any damage is visible
- Reassemble all components in reverse order, ensuring each filter, bin, and cover clicks or screws into place firmly to maintain the air seal
- Test suction on a bare floor surface before reconnecting attachments to confirm airflow has been restored
How to Prevent Vacuum Suction Loss
Preventive maintenance is significantly less time-consuming than troubleshooting and repairing suction loss after it occurs. Empty the dust bin after every use or when it reaches 70% full — this maintains optimal cyclone efficiency and prevents debris from coating the pre-motor filter. Clean or replace filters every 3–6 months for heavy-use households, and inspect them monthly for visible debris accumulation.
Check the brush roll for tangled hair and carpet fibers on a weekly basis, especially in homes with pets. Cut away tangles with scissors rather than pulling, which can damage the bristles or dislodge the axle. Avoid vacuuming wet spills or liquid spills entirely — moisture entering the dust bin or filters creates mold growth and degrades motor performance. Store the vacuum with the dust bin removed to allow air circulation and prevent mold and odor buildup inside the unit. Replace drive belts every 6 months in high-use households to prevent belt failure during cleaning.
When Suction Loss Indicates a Motor Problem
Motor failure accounts for only 8% of vacuum suction loss cases, making it a relatively uncommon cause — but it is the most serious. A failing motor produces a distinct burning smell, a rattling noise from the motor housing, or the vacuum shutting off automatically during operation. The automatic shutoff indicates thermal overload protection, triggered when the motor overheats due to prolonged strain from restricted airflow or debris ingestion.
When the motor fails, suction cannot be restored through filter cleaning, bin emptying, or hose clearing. A failed motor cannot be repaired and requires either professional motor replacement or replacement of the entire vacuum unit. If suction loss persists after cleaning all filters, unclogging the hose, and confirming the brush roll and belt are functional, the motor is the likely culprit. In this case, discontinue use and consult a vacuum repair professional or consider replacement, as running a vacuum with motor failure poses a fire risk.
Frequently Asked Questions
Q: Why is my vacuum losing suction but the dust bin is empty?
A: When the dust bin is empty but suction is still low, the most likely cause is a clogged filter or blocked hose. Replace or clean both filters and run a dowel through the hose to remove any lodged debris. If suction does not improve, the brush roll may be jammed or the motor may be failing.
Q: How often should I replace vacuum filters to prevent suction loss?
A: Foam pre-motor filters should be cleaned every 3 months and replaced every 6–12 months. HEPA filters should be replaced every 6–12 months depending on usage frequency. Non-washable HEPA filters must never be washed — washing destroys the electrostatic charge that captures fine particles.
Q: Can a full vacuum bag cause suction loss?
A: Yes — a vacuum with a bag experiences the same airflow restriction when the bag reaches capacity. A full bag creates a complete seal that prevents air from entering, causing total suction loss. Replace bag-style vacuum bags when they reach 50–70% full for optimal performance.
Q: Why does my vacuum lose suction only on carpet?
A: Suction loss on carpet specifically indicates a brush roll issue, carpet attachment clog, or the vacuum height setting being incorrect for carpet pile height. Check that the brush roll is rotating freely and that the height adjustment is set appropriately for thick or shag carpet.


