How to Fix a Slow-Draining Bathroom Sink
How to Fix a Slow-Draining Bathroom Sink
A slow-draining bathroom sink is fixed by removing the pop-up stopper, clearing accumulated hair and soap scum, and flushing the drain with a boiling water and baking soda solution — restoring full flow in under 30 minutes without professional tools. The most common cause is biofilm and hair buildup on the stopper and inside the drain tube, which restricts water flow progressively rather than blocking it entirely. Regular maintenance prevents recurrence and keeps the drain running freely year-round.
Bathroom sink drains in standard residential plumbing use a 1¼-inch (32 mm) inside-diameter tailpiece and P-trap assembly. At that narrow diameter, even a thin layer of biofilm — a sticky matrix of bacteria, soap residue, and organic debris — reduces the effective opening enough to slow drainage noticeably. According to the International Association of Plumbing and Mechanical Officials (IAPMO), the minimum flow rate for a bathroom lavatory drain is 1 gallon per minute (GPM); biofilm accumulation can reduce actual flow to well below that threshold.
What Causes a Slow-Draining Bathroom Sink
Hair and skin cells accumulate daily and bind to soap residue, creating biofilm inside the drain. This biofilm is a living matrix of bacteria that thrives in the warm, moist environment of bathroom plumbing. Each time you wash your hands, shave, or brush your hair over the sink, organic material enters the drain and adheres to the pipe walls, building up layer by layer.
Water flow restriction worsens gradually, which is why sinks drain slowly for weeks before becoming noticeable. Unlike a sudden full blockage caused by a large object, biofilm and hair accumulate incrementally. You may first notice water pooling for a few extra seconds after brushing your teeth, then progressively longer until standing water remains for a minute or more.
The pop-up stopper is the primary collection point for debris and requires removal for thorough cleaning. The stopper’s narrow neck — typically ¼ inch in diameter — acts as a catch point where long hairs wrap tightly and accumulate. Below the stopper, the pivot rod that controls the stopper’s up-and-down movement provides another surface where hair and soap scum collect.
In hard water areas, mineral deposits from calcium and magnesium carbonate build up faster and narrow the pipe diameter further. Hard water deposits form a rough, chalky layer inside pipes that gives biofilm more surface area to grip. Homes with water hardness above 7 grains per gallon (120 mg/L calcium carbonate) see significantly faster drain restriction than soft-water regions.
Step 1: Remove and Clean the Pop-Up Stopper
The pop-up stopper sits at the top of the drain assembly and collects the majority of hair and debris that causes slow drainage. Removing it takes under five minutes and reveals the source of most slow-drain problems. You do not need to remove the entire drain assembly — only the stopper and the pivot rod that holds it in place.
- Locate the pivot rod connector behind the sink, under the cabinet. The pivot rod is a horizontal metal rod that enters the drain tailpiece through a small hole, connecting the faucet’s stopper lever to the stopper itself. Follow the tailpiece down from the sink drain and you will see the rod entering from the back.
- Disconnect the pivot rod by compressing the retaining clip (a flat metal or plastic spring clip) and sliding it off the rod. On some assemblies, you may need to unscrew a retaining nut by hand instead. Pull the pivot rod straight out of the tailpiece — the stopper is now free.
- Lift the stopper straight up and out of the drain. If it resists, twist it slightly while pulling upward. In most cases, once the pivot rod is removed, the stopper lifts out easily.
- Remove hair wrapped around the stopper neck with your fingers or needle-nose pliers. You will typically find a dense cylinder of hair, soap residue, and organic material wound tightly around the stopper’s stem — this single mass is responsible for the majority of slow-drain issues.
- Scrub the stopper with dish soap and warm water to remove the remaining biofilm residue. Use an old toothbrush to clean the underside of the stopper head and the full length of the stem. Rinse thoroughly before reinserting.
For detailed guidance on stopper maintenance and replacement, see our guide on how to clean a bathroom sink pop-up stopper. To address the specific problem of hair accumulation, refer to our article on how to remove hair from a bathroom drain.
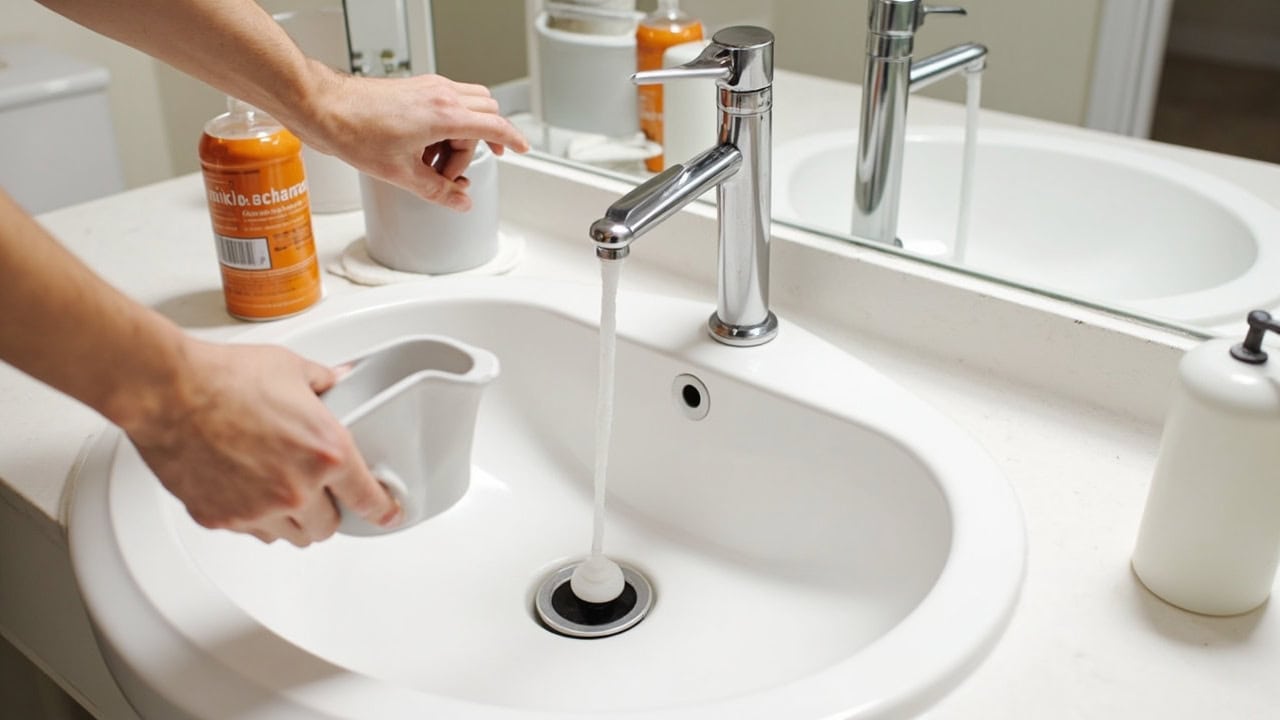
Step 2: Flush the Drain with Boiling Water and Baking Soda
With the stopper removed, you have direct access to the drain opening for a chemical-free flush using common household products. White vinegar (5% acetic acid, pH 2.5) reacts with baking soda (sodium bicarbonate, pH 8.3) to produce carbon dioxide gas and a mild cleaning action that breaks down soap scum and organic deposits inside the drain walls. While the reaction itself is not a strong solvent, the physical agitation from the bubbling action combined with the heat of boiling water effectively loosens and flushes accumulated debris.
- Pour ½ cup of baking soda directly into the exposed drain opening. Use a dry measuring cup and pour slowly so the powder falls into the drain rather than clinging to the basin. If the drain is standing water-free (which it should be after removing the stopper), the baking soda will coat the interior walls of the tailpiece.
- Follow with 1 cup of white vinegar. Pour it slowly to allow the fizzing reaction to work inside the drain rather than overflowing the basin. The carbon dioxide bubbles help dislodge soap scum and organic film from the pipe walls. Wait 5–10 minutes for the chemical reaction to work on organic buildup. During this time, the vinegar’s mild acidity continues to dissolve mineral deposits from hard water while the baking soda acts as a gentle abrasive on the soap scum layer.
- Pour 2–3 quarts of boiling water slowly into the drain to flush loosened debris. Heat water to a rolling boil (212°F / 100°C) in a kettle or large pot. Pour in a steady, slow stream — dumping the full volume at once can crack porcelain or warp PVC fittings. The near-boiling water melts soap residue and carries the loosened biofilm down through the P-trap and into the branch drain line.
- Test the drain by running the faucet at full flow. If water drains freely within 10 seconds of shutting off the faucet, the clog is cleared. If it still drains slower than expected, repeat the baking soda and vinegar flush one more time before proceeding to P-trap removal.
The baking soda and vinegar method is safe for all common drain pipe materials — PVC, ABS, chrome-plated brass, and copper — and can be used as a weekly preventative flush without risk of corrosion or pipe degradation.
Step 3: Clean the P-Trap if the Clog Persists
If the stopper cleaning and baking soda flush did not restore full drainage, the blockage is likely sitting in the P-trap — the U-shaped pipe directly below the sink drain. The P-trap is designed to hold a water seal that prevents sewer gases from entering the home, but its curved shape also makes it a natural collection point for hair, soap chunks, and heavy debris that pass through the stopper opening.
- Place a bucket or large container directly under the P-trap. The trap holds roughly 1–2 cups of water at all times, and opening the connections will release this water along with any debris. A 2-quart container provides adequate capacity.
- Unscrew the P-trap connections by hand. Most residential P-traps use threaded slip nuts with flexible washers. Grip the trap body with one hand and turn the nuts counterclockwise with the other. If the nuts are too tight for hand loosening, use channel-lock pliers with a protective rag over the nut to avoid gouging the finish.
- Remove the trap and inspect for blockage. Hair and soap chunks commonly collect at the curve of the trap where the water flow slows and changes direction. Pull out any visible obstructions with your fingers or needle-nose pliers. Shine a flashlight through both ends to check for partial blockages inside the trap body.
- Clean the inside of the trap with a bottle brush, dish soap, and hot water. Scrub the interior walls thoroughly to remove the biofilm coating. For mineral-heavy deposits, soak the trap in a 50/50 solution of white vinegar and hot water for 15 minutes before scrubbing.
- Reassemble hand-tight, then snug with pliers a quarter-turn more. Do not over-tighten — the flexible washers create the seal, not thread torque. Over-tightening cracks the washers and causes slow leaks that damage the cabinet floor over time. Run water for 30 seconds and check both connections for drips.
The diagram above shows the full under-sink assembly: the vertical tailpiece from the drain, the P-trap U-shaped pipe, the horizontal branch pipe connecting to the wall, and the pivot rod assembly that controls the pop-up stopper. Understanding this layout helps you identify where debris collects at each stage of the drain path.
How to Prevent Future Slow Drains
Preventing slow drains is significantly easier than clearing them once they develop. A consistent maintenance routine takes under five minutes per week and eliminates the progressive biofilm buildup that causes most slow-drain problems. These four preventative measures address every stage of the drain path.
- Install a mesh drain cover to catch hair before it enters the drain — clean it weekly. Stainless steel or silicone mesh screens fit inside standard 1¼-inch drain openings and capture hair, dental floss, and other debris before it enters the tailpiece. Empty the screen into the trash after each use, and wash it with dish soap weekly to prevent biofilm growth on the mesh itself.
- Flush the drain with boiling water weekly to prevent soap scum accumulation. Pour 2 quarts of boiling water down the drain once per week — this melts soap residue before it hardens and flushes early-stage biofilm out of the P-trap. This is the single most effective preventative measure.
- Remove and clean the stopper monthly as routine maintenance. A monthly stopper cleaning takes under five minutes and prevents the slow buildup that eventually requires a full drain-clearing session. Follow the procedure in Step 1 above.
- Avoid pouring grease, oil, or facial creams down the bathroom sink. These substances are liquid at body temperature but solidify inside cooler drain pipes, creating a sticky surface that accelerates hair and debris accumulation. Dispose of cosmetic products in the trash instead.
For a comprehensive approach to maintaining all bathroom surfaces and fixtures, see our bathroom cleaning guide. If you also deal with kitchen drain issues, our article on how to fix a clogged kitchen sink drain covers the related plumbing and clearing methods specific to kitchen drains.
Common Mistakes When Fixing a Slow Drain
Several common approaches to slow drains actually worsen the problem or create new ones. Understanding these mistakes saves time, money, and prevents pipe damage that leads to costly repairs.
Using Chemical Drain Cleaners Regularly
Chemical drain cleaners rely on strong bases (sodium hydroxide or potassium hydroxide) or strong acids (sulfuric acid) to dissolve organic blockages through aggressive chemical reactions that generate significant heat. The U.S. Environmental Protection Agency (EPA) classifies many of these products as hazardous household waste due to their corrosive nature. Regular use of chemical drain cleaners corrodes metal pipes from the inside, degrades the flexible washers in P-trap slip joints, and can crack PVC fittings — particularly older or thin-walled pipes. The chemical reaction also kills beneficial bacteria in septic systems. The baking soda and vinegar method described in Step 2 provides a safer, non-corrosive alternative that is effective for routine maintenance.
Over-Tightening P-Trap Connections
Hand-tight plus a quarter-turn with pliers is sufficient for P-trap slip nuts. The tapered flexible washers inside the nuts create the watertight seal — not the force of the threads. Over-tightening compresses and cracks these washers, which causes slow leaks that go unnoticed inside the cabinet until the plywood floor swells or mold develops. If you find yourself needing significant force to stop a drip, the washer is likely worn or misaligned and should be replaced rather than tightened further.
Skipping the Stopper Cleaning
Jumping straight to chemical cleaners or drain flushing without removing and cleaning the pop-up stopper is the most common mistake. The stopper holds the majority of drain-restricting debris — hair wrapped around the stem accounts for an estimated 70–80% of the total obstruction in most slow-drain cases. Flushing the drain with the stopper still installed clears only the pipe below it, leaving the primary blockage in place.
Using Improvised Tools That Push Deeper
A straightened coat hanger or similar rigid wire pushed into the drain often pushes the hair clog deeper into the pipe rather than pulling it out. Once the clog moves past the P-trap and into the branch drain line inside the wall, it becomes significantly harder to clear and may require a plumber’s auger or professional drain cleaning to resolve. Always pull debris toward you rather than pushing it further down the drain.
For related drain and fixture cleaning guidance, explore our kitchen cleaning guide and the CleaningTuts cleaning glossary for detailed definitions of terms like biofilm, soap scum, P-trap, and hard water deposits.
Frequently Asked Questions
Q: Can I use chemical drain cleaners on a slow bathroom sink drain?
A: Chemical drain cleaners are not recommended for bathroom sinks because the formulas designed for kitchen grease are ineffective on hair and soap scum, and the harsh chemicals accelerate corrosion of metal drain components and degrade plastic P-traps over time. The U.S. EPA classifies many drain cleaners containing sodium hydroxide or sulfuric acid as corrosive hazardous materials, and their use in narrow-diameter bathroom pipes increases the risk of heat-related damage to PVC and ABS fittings. The baking soda and vinegar flush described in this article provides a safer, equally effective alternative for routine maintenance.
Q: How long does it take to fix a slow-draining bathroom sink?
A: A slow-draining bathroom sink can be fixed in 15–30 minutes using the baking soda and vinegar method — the P-trap cleaning method adds another 10–15 minutes for a total of 25–45 minutes if the clog is severe. Most slow-drain problems are resolved at the stopper-cleaning stage (Step 1), which takes roughly 5 minutes. The baking soda flush (Step 2) adds approximately 15 minutes including the 5–10 minute reaction wait time. P-trap removal and cleaning (Step 3) is only necessary in roughly 20–30% of cases.
Q: Do I need special tools to unclog a bathroom sink drain?
A: No special tools are required — a cup plunger, bucket, and optionally a pair of channel-lock pliers are sufficient for clearing most bathroom sink clogs without calling a plumber. Needle-nose pliers help with hair removal from the stopper but are not strictly necessary if you are comfortable using your fingers. A bottle brush makes P-trap cleaning easier but an old toothbrush works as a substitute. The total cost of supplies for this project is under $10 if you need to purchase baking soda and vinegar.
Q: Why did my sink drain fine then start draining slowly again after I fixed it?
A: Persistent slow draining after cleaning usually means the clog is deeper in the branch drain line (the pipe in the wall) rather than at the stopper or P-trap, which requires a toilet auger or professional drain cleaning to fully clear. Another possibility is that the stopper was reassembled incorrectly — if the pivot rod was inserted above the stopper’s hole instead of through it, the stopper sits partially closed and restricts water flow even when the faucet lever is in the “open” position. Check the stopper alignment first before assuming the clog has moved deeper into the plumbing.
References
- U.S. Environmental Protection Agency. (2024). Safer Choice Labels for Household Cleaners. EPA.gov.
- International Association of Plumbing and Mechanical Officials. (2024). Uniform Plumbing Code Technical Resources. IAPMO.org.
- United States Geological Survey. (2019). Hardness of Water. USGS.gov.
- Cornell University Cooperative Extension. (2023). Household Cleaner Chemistry and Safety. Cornell.edu.


