How to Clean Boat Hull: Complete Guide
Boat hulls must be cleaned within 48 hours of removal from water using a pH-neutral biodegradable cleaner applied at a 1:10 dilution ratio and rinsed thoroughly to prevent marine growth reattachment. The process requires working from top to bottom in 3-foot sections, allowing the cleaning solution to dwell for 5–10 minutes before scrubbing with a soft-bristled brush to avoid gelcoat damage. Cleaning within this 48-hour window is critical because biofouling organisms begin forming a conditioning film on submerged surfaces within minutes of exposure, progressing to a mature biofilm colony within 24 hours and visible macrofouling — including barnacles, tubeworms, and algae — within one to three weeks.
Research published in marine biofouling studies identifies four distinct colonization stages: initial molecular adsorption (minutes to hours), bacterial biofilm formation (1–7 days), microfouling by unicellular organisms (1–2 weeks), and macrofouling by larger organisms (2–3 weeks and beyond). Once macrofouling establishes, barnacle adhesion strength can exceed 0.5 MPa (approximately 70 PSI), requiring mechanical removal tools that risk hull surface damage. The International Maritime Organization (IMO) estimates that biofouling increases ship drag by up to 60% and fuel consumption by up to 40%, making regular hull cleaning both a maintenance necessity and an economic imperative.
What You Need Before You Start
Tools Required
- Pressure washer — rated for 1500–2500 PSI with adjustable pressure settings for different hull materials
- 25-degree pressure washer nozzle — provides a fan pattern wide enough for hull coverage without concentrating force on a single point
- Soft-bristled hull brush or boat brush — with an extendable pole reaching 6–10 feet for working the hull from a standing position
- Garden hose with adjustable nozzle — for pre-rinse and post-cleaning rinse cycles
- Hand scrubbing brush — for targeting stubborn growth at the waterline and around fittings
- Pump sprayer — 1–2 gallon capacity for controlled cleaning solution application
- Protective gloves and safety glasses — chemical-resistant nitrile gloves rated for marine cleaning solutions
Cleaning Agents
- pH-neutral biodegradable boat hull cleaner — formulated with surfactant compounds rated pH 6.5–7.5 to lift marine organisms without degrading gelcoat; look for EPA Safer Choice or similar certifications
- White vinegar — undiluted (5% acetic acid, pH 2.5) for dissolving calcium and mineral deposits at the waterline; effective within 10–15 minutes of dwell time Marine-grade hull wax — polymer-based or carnauba blend formulated for UV protection and salt resistance, applied after cleaning to create a slick barrier that slows future fouling adhesion
Safety Warning: Never pressure wash a hull while it is still in the water. Water intrusion through fittings, through-hull penetrations, and deck joints causes mold growth behind interior panels and electrical damage to submerged wiring harnesses. Always clean on a stable trailer or lift with the vessel secured.
Step-by-Step Hull Cleaning Process
- Remove the boat from water and position on a stable trailer or lift cradle on level ground. Ensure the boat is chocked and secured before beginning any cleaning work. The hull must be completely dry to the touch before applying wax in later steps.
- Rinse the hull thoroughly with fresh water using a garden hose, starting from the top (gunwale) and working downward to the keel. This removes loose salt crystals, sand, and unattached organic debris that would otherwise be ground into the surface during scrubbing. Use a steady stream, not a mist — the goal is volume, not pressure, at this stage.
- Apply hull cleaner solution at a 1:10 dilution ratio (1 part concentrated cleaner to 10 parts fresh water) using a pump sprayer. Cover 3-foot horizontal sections, working from the waterline downward. This section-by-section approach prevents the cleaning solution from drying before you can rinse it — a critical concern because dried cleaner leaves residue that actively attracts new marine growth.
- Allow dwell time of 5–10 minutes. The surfactant compounds in the cleaner need contact time to penetrate the biofilm layer and break the adhesive bonds holding organisms to the hull surface. Do not let the solution dry on the surface — if you observe drying (common in direct sun or wind), mist the section lightly with fresh water to reactivate the cleaner.
- Scrub the hull using a soft-bristled brush attached to an extendable pole, working in overlapping circular motions from top to bottom. Apply moderate pressure — enough to dislodge growth, but not so much that you risk scratching gelcoat. On fiberglass hulls, visible scratches indicate you are pressing too hard or using a brush with bristles stiffer than medium-soft.
- Target stubborn growth areas — specifically the waterline band, the stern transom, and the leading edge of the keel — with a hand brush using undiluted cleaner applied directly. These three zones accumulate the heaviest fouling because they experience the longest continuous submersion and, in the case of the leading edge, the highest hydrodynamic pressure forcing organisms against the surface.
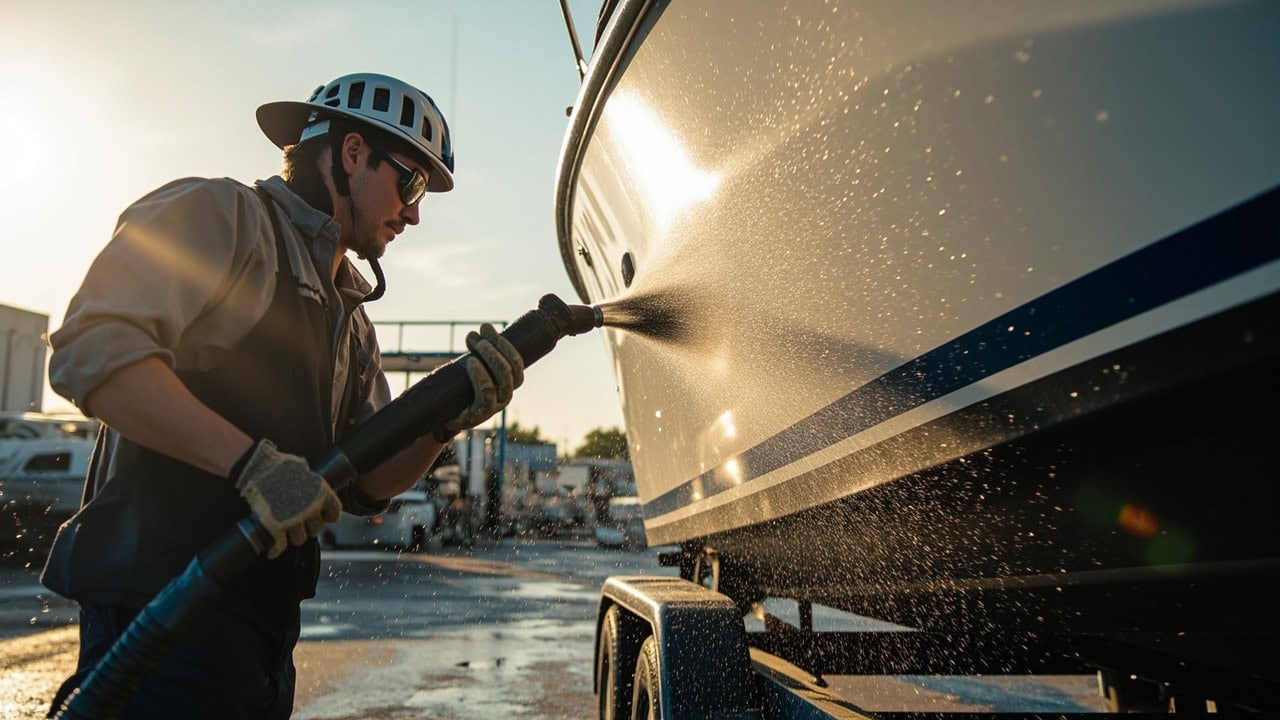
- Rinse each section completely with the pressure washer at 1500–2000 PSI using a 25-degree nozzle, holding the wand 12–18 inches from the surface at a 45-degree angle. The 25-degree fan spreads the water force across a wide band, while the 45-degree angle directs debris away from rather than into the hull surface. Never use a 0-degree (pencil) nozzle on any hull material — it concentrates force into a point that can gouge gelcoat in a single pass.
- Inspect for remaining deposits by running a clean, dry hand over the hull surface. Rough patches indicate residual biofilm or calcium deposits that require a second scrubbing cycle. Pay particular attention to the area just below the waterline, around thru-hull fittings, and along the chine where growth accumulates in corners.
- Apply marine hull wax once the hull is completely dry (minimum 30–45 minutes air drying in shade). The wax fills the microscopic pores in gelcoat left by cleaning, restoring the hydrophobic surface that makes it harder for fouling organisms to establish initial adhesion in future use.
Important: Always work in shade and on a cool hull surface. Cleaning solution dries within 3–5 minutes in direct sunlight, rendering the surfactant ineffective before the dwell time is complete. If shade is unavailable, clean the hull in the early morning or late afternoon when surface temperatures are below 80°F (27°C).
Boat Hull-Specific Considerations
Materials and Their Vulnerabilities
Different hull materials require different cleaning approaches. Using the wrong pressure, chemical, or tool on a specific material can cause irreversible damage that requires professional repair. The table below summarizes the safe cleaning parameters for the four most common hull materials.
| Hull Material | Cleaning Method | Products to Avoid |
|---|---|---|
| Fiberglass / Gelcoat | Soft brush + pH-neutral cleaner at 1500–2000 PSI | Abrasive pads, bleach above 10% concentration, acidic cleaners below pH 4 |
| Aluminum | Soft brush + mild alkaline cleaner at 1200–1500 PSI | Steel wool, pressure above 2000 PSI near rivets and welds, acidic cleaners (cause galvanic corrosion) |
| Wooden (plank) | Hand scrubbing only + mild marine soap at 800–1000 PSI maximum | Power washing above 1000 PSI, harsh chemical strippers, bleach solutions |
| Inflatable (PVC / Hypalon) | Soft cloth + fresh water only, no pressure washer | Petroleum-based solvents, stiff brushes, any cleaner containing acetone or MEK |
Critical No-Go Zones
- Hull fittings and through-hull penetrations: Never direct pressure washer streams at thru-hull fittings, transducer mounts, speedometer pits, or drain plugs. The pressurized water can force past seals and enter the bilge, causing corrosion in electrical connections and saturation of wooden structural members.
- Aluminum hulls and acidic cleaners: Acidic cleaners with pH below 5.0 dissolve the protective aluminum oxide layer on aluminum hulls, initiating dezincification and galvanic corrosion between dissimilar metal fasteners. Even brief exposure to muriatic acid (pH 1) at 10% dilution etches aluminum surfaces within 60 seconds. Use only alkaline-based marine cleaners rated pH 8–10 on aluminum hulls.
- Household dish soap: The fats, oils, and lipid-based surfactant compounds in dish detergent leave a microscopic film on hull surfaces that actively promotes marine organism adhesion. This film acts as a nutrient source for bacteria, accelerating biofilm formation by 30–50% compared to an uncoated surface. Always use marine-specific hull cleaners.
Drying and Finishing the Hull
- Allow the hull to air dry completely in a shaded area for a minimum of 30–45 minutes. Direct sun heats the gelcoat surface, causing any remaining moisture to evaporate too quickly and leave water spots. If ambient humidity is above 70%, extend drying time to 60 minutes.
- Run your hand over the surface to detect any rough patches indicating remaining residue. A properly cleaned hull should feel uniformly smooth — any grit or roughness means residual calcium or biofilm remains and the section needs re-cleaning before wax is applied (wax seals residue against the surface, making future removal far more difficult).
- Apply marine-grade hull wax using a foam applicator pad in thin, circular motions. Work in 2-foot sections, applying wax in a consistent pattern to ensure even coverage. Most marine waxes require 10–15 minutes of curing time before buffing — consult the product label for specific timing, as polymer sealants and carnauba waxes differ.
- Buff to a high shine using a clean microfiber cloth attached to an orbital buffer at low RPM (800–1200). Avoid high-speed rotary buffers — they generate friction heat that can soften gelcoat and create swirl marks visible in direct sunlight.
- Inspect the hull underside (if accessible on the trailer) for any peeling paint, gelcoat blisters (osmotic blistering), or impact damage requiring repair. Document any findings with photographs for your maintenance records or a marine surveyor.
Drying Tip: Position the boat at a slight angle on the trailer (bow up approximately 5 degrees) to encourage water runoff and prevent pooling in corners, around the transom, and in the keel cavity where standing water prolongs drying time significantly.
Common Mistakes When Cleaning Boat Hulls
- Waiting too long after removal from water: Marine growth becomes exponentially harder to remove after 48 hours. Biofilm colonies produce an extracellular polymeric substance (EPS) matrix that cures and hardens over time — within 72 hours of air exposure, this matrix bonds to the gelcoat with sufficient strength to require chemical strippers or mechanical abrasives that risk surface damage. For guidance on tackling tough growth stains, see our article on how to remove waterline stains from boat hulls.
- Using incorrect pressure settings: Exceeding 2500 PSI on gelcoat surfaces causes pitting — microscopic craters that dull the finish and create anchor points for future fouling. On aluminum hulls, pressures above 2000 PSI near rivets and welded seams can force water into lap joints, promoting hidden corrosion. For product-specific guidance, see our best cleaning products for boat hull materials comparison.
- Working in direct sunlight: Cleaning solution dries within 3–5 minutes on a sun-heated hull (surface temperatures can exceed 120°F / 49°C in direct summer sun), rendering the surfactant ineffective before the required 5–10 minute dwell time is reached. The result is streaky, incomplete cleaning that requires rework.
- Using abrasive tools on gelcoat: Steel brushes, scouring pads, and abrasive powdered cleaners create microscopic scratches in the gelcoat’s outer layer. These scratches increase the surface area available for organism attachment by 200–400% compared to a smooth, polished surface, accelerating future fouling rates dramatically.
- Skipping the wax protection step: Unprotected gelcoat develops chalking — a powdery surface oxidation — within 2–3 cleaning cycles if wax is not reapplied. Once chalking begins, the rough texture is permanent without wet sanding and compound restoration. Wax creates a sacrificial barrier that takes the wear of cleaning and UV exposure instead of the gelcoat itself.
- Incomplete rinsing: Residual cleaner left on the surface after insufficient rinsing attracts new marine growth faster than a properly rinsed hull. The phosphates and organic compounds in some cleaners serve as nutrients for marine bacteria, jumpstarting the biofilm formation cycle within hours of relaunching the vessel.
When to Use Professional Hull Cleaning Services
Most routine hull cleaning falls within the capability of boat owners with the right tools and products. However, certain situations require professional marine detailing services that have access to specialized equipment, training, and environmental compliance certifications.
- Heavy calcium and barnacle buildup: When a hull has not been cleaned in over 30 days, barnacle colonies can reach sizes that require scraping tools and acid-based descaling solutions that pose both surface damage and personal safety risks. Professional detailers use controlled application methods and neutralizing rinses to remove heavy fouling without etching the underlying gelcoat.
- Aluminum hull oxidation: Aluminum hulls that develop surface oxidation (visible as a white, powdery residue) require specialized acid-based treatments followed by protective coatings that must be applied in a specific sequence. Improper application can trigger galvanic corrosion between aluminum plating and steel fasteners. Year-round in-water storage: Boats stored in water year-round accumulate submerged growth on running gear (propellers, shafts, struts, and rudders) that requires underwater cleaning by trained divers using approved tools. Many marinas and municipalities require professional in-water cleaning to comply with environmental regulations prohibiting the release of biofouling organisms into local waterways.
- Gelcoat chalking and oxidation restoration: Fiberglass gelcoat that has developed chalking or oxidation beyond what wax can correct requires wet sanding (starting at 800-grit, progressing through 2000-grit) followed by compound polishing and sealing. This multi-stage process requires an orbital polisher, specialized compounds, and the experience to avoid burning through the gelcoat layer — which is typically only 15–25 mils (0.38–0.64 mm) thick on production boats.
For a broader overview of specialty cleaning tasks beyond hull maintenance, visit our specialty cleaning guide. And if you are also maintaining polished floor surfaces at home or in a marine facility, many of the same principles regarding pH-neutral cleaning and gentle abrasive avoidance apply across both gelcoat and polished stone surfaces.
Frequently Asked Questions
Q: Can I use bleach to clean my boat hull?
A: Bleach at concentrations above 10% causes gelcoat degradation and pitting on fiberglass hulls — it is not recommended. Use a pH-neutral biodegradable hull cleaner instead, which safely removes marine growth without damaging the hull surface or harming surrounding marine ecosystems. Even diluted bleach at 5–6% sodium hypochlorite (typical household concentration) can degrade gelcoat sealants and rubber boot strips with repeated use.
Q: How often should I clean my boat hull?
A: Boat hulls should be cleaned at minimum every 14 days during active use seasons, and within 48 hours of removal from water if the boat has been sitting. Hulls in brackish or warm water environments may require cleaning every 7–10 days due to accelerated marine growth rates. Freshwater hulls in cool climates can extend cleaning intervals to 21 days, but should still be inspected weekly for early biofilm formation.
Q: Will pressure washing damage my boat hull?
A: Pressure washing at 1500–2000 PSI with a 25-degree nozzle is safe for properly maintained gelcoat and painted hulls when held 12–18 inches away at a 45-degree angle. Never exceed 2500 PSI and never direct concentrated streams at hull fittings, seams, or surface penetrations. Aluminum hulls should be cleaned at 1200–1500 PSI maximum, and wooden hulls should not exceed 800–1000 PSI.
Q: What is the waterline on a boat hull and why does it need special attention?
A: The waterline is the visible horizontal line on the hull where the boat sits at rest in the water — it is the primary zone for biofouling accumulation including algae, barnacles, and mineral deposits. This area requires the longest dwell time (10–15 minutes) and the most thorough scrubbing because it experiences the highest concentration of marine organism colonization. The waterline band, typically 4–8 inches wide, alternates between submersion and air exposure, creating ideal conditions for both algal and calcareous growth.
References
- International Maritime Organization. (2023). Biofouling and the 2023 IMO Guidelines for the Control and Management of Ships’ Biofouling. IMO Publishing.
- Schultz, M.P., et al. (2011). “Economic Impact of Biofouling on a Naval Surface Ship.” Biofouling, 27(1), 87–98. Taylor & Francis.
- Yebra, D.M., et al. (2004). “Antifouling Technology — Past, Present and Future Steps towards Efficient and Environmentally Friendly Antifouling Coatings.” Progress in Polymer Science, 29(8), 815–842. Elsevier.
- U.S. Environmental Protection Agency. (2024). Safer Choice Standard for Cleaning Products. EPA.gov.
- American Boat and Yacht Council. (2022). ABYC Standards and Technical Information Reports for Small Craft. ABYC Inc.


