How to Clean a Microwave: Complete Guide
A microwave is cleaned most effectively using the steam method: heat 1 cup of water with 2 tablespoons of white distilled vinegar in a microwave-safe bowl on high for 5 minutes, then let the steam dwell for 2–3 minutes before wiping all interior surfaces with a microfiber cloth. This method dissolves dried food splatter without abrasive scrubbers or chemical cleaners that damage interior finishes and leave toxic residues. Stubborn stains require a baking soda paste at a 3:1 ratio with water, applied for 10–15 minutes before gentle scrubbing. The entire process takes approximately 20 minutes and uses only household staples.
What You Need Before You Start
Gathering all supplies before starting prevents mid-process interruptions that allow steam to escape and reduces cleaning effectiveness. Microwave cleaning requires only basic household items — no commercial chemical cleaners are necessary. The vinegar-and-water steam method relies on acetic acid (CH₃COOH) at approximately 5% concentration in standard white distilled vinegar, which provides a pH of roughly 2.5 — acidic enough to break down alkaline food residues through chemical reaction without corroding microwave interior surfaces.
Tools
- Microwave-safe glass or ceramic bowl — Must be large enough to hold at least 1 cup of liquid with room for boiling. Glass and ceramic withstand sustained high heat without warping or leaching chemicals. Never use plastic containers not explicitly labeled microwave-safe, as they can melt at extended heating durations and release bisphenol compounds into the cleaning steam.
- Microfiber cloths (at least 2) — One cloth for initial wiping of loosened debris and a second for the final clean pass. Microfiber fibers trap particles rather than pushing them across surfaces, which prevents scratching on enamel and plastic interiors.
- Soft-bristle cleaning brush or old toothbrush — For crevices around door seals, hinge areas, and vent openings where grease accumulates and steam alone cannot reach effectively.
- Sponge with non-abrasive surface — For washing the removable turntable and rotating ring in the sink. Avoid abrasive scrubbing pads that can scratch the glass turntable surface.
Cleaning Agents
- White distilled vinegar — 2 tablespoons per 1 cup of water. The 5% acetic acid concentration provides the primary cleaning action through its low pH, reacting with alkaline fats and food residues.
- Baking soda (sodium bicarbonate) — For stubborn stain paste at a 3:1 ratio with water. Acts as a mild abrasive at Mohs hardness 2.5, gentle enough for all microwave interior materials. Lemon juice (optional) — For deodorizing. Citric acid in lemon juice (pH approximately 2.0) complements the acetic acid and leaves a neutral scent after drying.
- Warm water — Warm water accelerates the dissolution of vinegar and increases the initial steam production rate.
Step-by-Step Microwave Cleaning Process
Each step below follows a specific sequence designed to maximize the steam’s cleaning effect before it dissipates. The steam method works through saponification — the acetic acid in vinegar (a weak acid at pH 2.5) reacts with alkaline fats and food acids in dried splatter to form water-soluble compounds. Combined with the thermal energy from steam, this chemical reaction breaks the bond between food particles and the microwave interior without physical force. Studies from NSF International have identified microwave handles and interiors as among the most bacteria-laden surfaces in household kitchens, making regular cleaning essential for food safety.
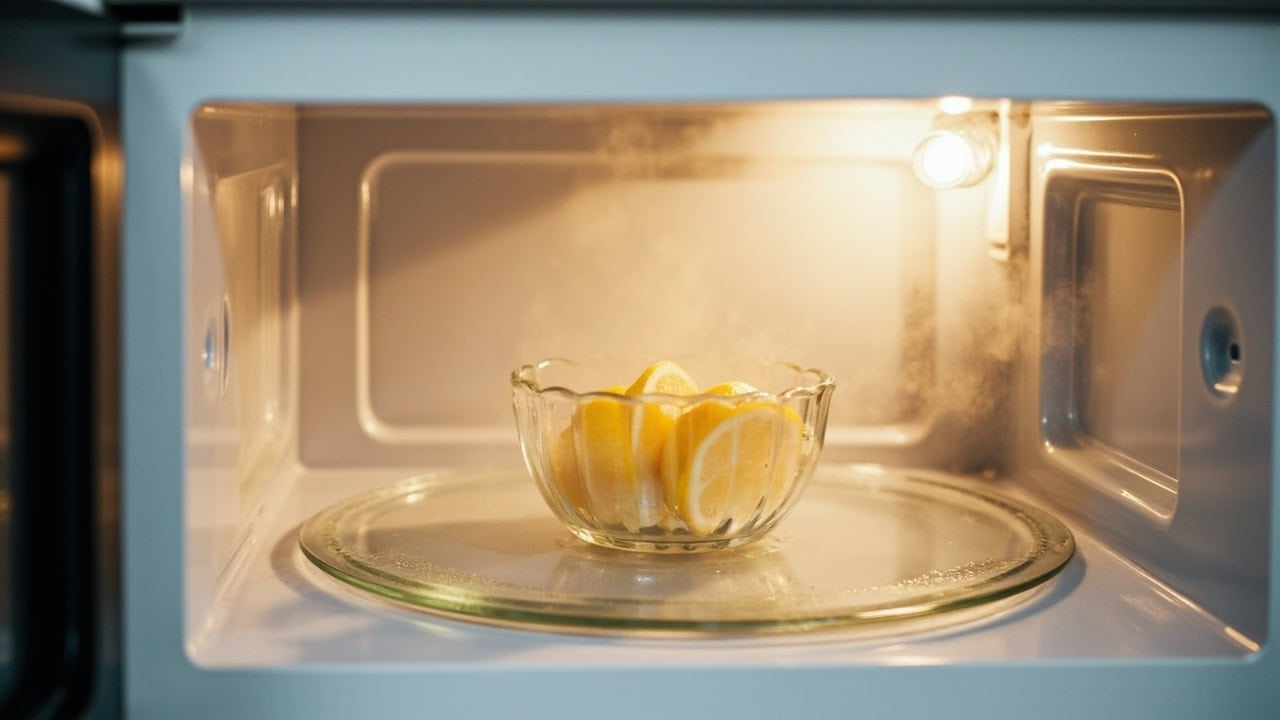
- Prepare the steam solution. Combine 1 cup of warm water with 2 tablespoons of white distilled vinegar in a microwave-safe glass or ceramic bowl. Add a lemon slice or 1 teaspoon of lemon juice for deodorizing if desired. The water-to-vinegar ratio of roughly 8:1 provides sufficient acetic acid concentration for effective cleaning while remaining safe for all interior surface types — plastic, stainless steel, and enamel coatings alike.
- Heat to create steam. Place the bowl in the center of the microwave and heat on the highest power setting for 5 minutes. Do not open the door during heating. The water will reach its boiling point (212°F / 100°C at standard atmospheric pressure) and produce steam that fills the entire cavity, coating walls, ceiling, and corners uniformly. The sustained 5-minute heating period ensures adequate steam volume to penetrate dried food residue on all surfaces, including overhead areas that are difficult to reach manually.
- Let the steam dwell. After the heating cycle completes, keep the microwave door closed for 2–3 minutes. This dwell time allows the steam to continue working on dried food particles and loosens grease buildup on surfaces. Opening the door immediately releases the steam before it has fully reacted with food residues, significantly reducing cleaning effectiveness. The internal temperature during this dwell period remains high enough (approximately 150–170°F) to keep the steam active without additional energy input.
- Remove turntable and accessories. Carefully remove the glass turntable and the rotating ring beneath it. The bowl of hot vinegar solution should be removed first using oven mitts or a dry towel — the bowl and its remaining liquid will be very hot. Wash the turntable and ring separately in warm soapy water using a non-abrasive sponge, or place them in the dishwasher if the manufacturer labels them as dishwasher-safe. Set aside to dry completely before reassembly.
- Wipe interior surfaces. Using a damp microfiber cloth, wipe all interior walls, the ceiling, and the floor of the microwave cavity. Start from the top and work downward so that loosened debris falls onto surfaces not yet cleaned. The steam will have softened and dissolved most dried food — it should wipe away with minimal pressure. Rinse the cloth in clean water as needed and wring it out well before continuing. A pH-neutral residue remains after wiping, which is safe for food-contact surfaces once dry.
- Address stubborn stains with baking soda paste. For dried-on residues that resist the steam treatment — particularly tomato-based sauces, curry, or caramelized sugars — apply a paste of baking soda and water mixed at a 3:1 ratio directly to the stain. Let the paste sit for 10–15 minutes to allow the mild alkaline action of sodium bicarbonate (pH 8.3 in solution) to break down the remaining food bonds. Gently scrub with a soft-bristle brush or old toothbrush using circular motions, then wipe clean with a damp cloth. For deeply set stains, repeat the paste application a second time.
- Clean door seals and edges. Use a toothbrush or soft-bristle brush dipped in the remaining vinegar solution to scrub the rubber door seal, hinge crevices, and vent openings. These areas accumulate grease and food particles that the steam cannot fully penetrate due to their narrow geometry. Pay particular attention to the bottom edge of the door seal, where splatters collect most heavily. Wipe the brushed areas with a damp cloth immediately after scrubbing to remove loosened debris.
- Wipe exterior surfaces. Clean the microwave exterior using the same vinegar solution applied to a microfiber cloth — avoid spraying liquid directly onto the appliance. Wipe the control panel, handle, sides, and top surface. For stainless steel exteriors, wipe in the direction of the grain to prevent streaking. The exterior handle is a high-touch surface that harbors bacteria transferred from hands during food preparation, so clean it thoroughly with the vinegar solution and allow it to air dry.
- Replace turntable and air dry. Reinsert the clean, completely dry turntable and rotating ring into the microwave cavity. Leave the door open for 10–15 minutes to allow all interior surfaces to air dry fully. This prevents moisture from becoming trapped in the cavity, which can promote mold and mildew growth in the door seal area. Once dry, run a 30-second heating cycle with a cup of clean water to eliminate any residual vinegar odor before using the microwave for food.
Microwave-Specific Considerations
Microwave interiors are constructed from three primary materials — plastic, stainless steel, and enamel coating — each with specific cleaning tolerances. The steam method described above is safe for all three because it uses only dilute acetic acid and thermal energy rather than abrasive force. However, certain cleaning products and tools will permanently damage these surfaces regardless of the cleaning method used.
What to Avoid When Cleaning a Microwave
- Bleach-based or ammonia-based cleaners — These chemicals corrode the protective interior coating on enamel and plastic microwave cavities. Chlorine bleach (sodium hypochlorite at pH 11–13) is highly alkaline and can degrade the polymer coating that prevents microwave energy from arcing inside the cavity. Ammonia-based products leave toxic residues that contaminate food during subsequent heating cycles. The chemistry of cleaning a microwave requires only mild acids — commercial chemical cleaners are unnecessary and counterproductive.
- Steel wool or abrasive scrubbers — These scratch the smooth interior finish on all three material types. Scratches in enamel create exposed metal that can rust and cause microwave arcing. Scratches in plastic create microscopic crevices where bacteria accumulate, making future cleaning progressively more difficult. Use only soft-bristle brushes and microfiber cloths.
- Plastic containers not labeled microwave-safe — Non-microwave-safe plastics can melt, warp, or leach bisphenol A (BPA) and phthalates when subjected to 5 minutes of sustained high-heat boiling. Use only glass or ceramic bowls for the steam cleaning solution.
- Excessive water pooled in the cavity — Water that seeps into vent openings or electronic components behind the interior wall can damage the magnetron and control circuitry. Always use a barely-damp cloth for wiping rather than a soaking-wet sponge.
Why the Steam Method Works
The steam cleaning method works through a combination of chemical and thermal mechanisms. Vinegar contains acetic acid at 5% concentration, producing a solution with pH approximately 2.5 when diluted with water. When heated to boiling, the resulting steam carries both thermal energy and dilute acetic acid vapor to every interior surface simultaneously, including overhead areas and corners that are difficult to reach with manual scrubbing.
The acid reacts with alkaline food residues — particularly fats, oils, and proteins — through a process related to saponification, converting insoluble fatty residues into water-soluble compounds that wipe away without mechanical force. Thermal energy from the steam simultaneously softens and expands dried food particles, breaking their adhesion to the interior surface. This dual action eliminates the need for abrasive scrubbing and works safely on all microwave interior materials: plastic, stainless steel, and enamel.
Drying and Finishing Your Microwave
Proper drying after cleaning prevents moisture-related problems that undermine the cleaning effort. Trapped moisture in the door seal, under the turntable, or in vent openings creates conditions favorable for mold and mildew growth — particularly in the warm, dark environment of a closed microwave cavity. Following a consistent finishing routine ensures the microwave is fully clean, dry, and odor-free before its next use.
- Leave the microwave door open for 10–15 minutes after cleaning to allow complete air drying of all interior surfaces, paying particular attention to the door seal area where moisture collects.
- Inspect the rubber door seal for any remaining debris or food particles. Run a finger along the entire seal perimeter to check for trapped material that could prevent a proper seal during operation.
- Replace the turntable only after confirming it is completely dry. A wet turntable can cause the rotating mechanism to slip during use and may leave water marks on the cavity floor.
- For stainless steel exteriors, buff the surface with a dry microfiber cloth in the direction of the grain to prevent water spots and fingerprint marks.
- Run a 30-second heating cycle with a cup of clean water after the full cleaning process to burn off any residual vinegar odor before heating food.
Common Microwave Cleaning Mistakes
Avoiding common errors extends the microwave’s lifespan and ensures food safety. The table below summarizes the most frequent cleaning mistakes, the specific problems they cause, and the correct alternative approach for each.
| Mistake | Why It Causes Problems | Correct Approach |
|---|---|---|
| Using bleach cleaners | Damages protective coating, leaves toxic residue that contaminates food | Use vinegar or baking soda only |
| Scrubbing with steel wool | Creates scratches that trap bacteria and can cause arcing in enamel | Use soft-bristle brush or microfiber cloth |
| Skipping the steam step | Dried-on food requires forceful scrubbing that damages surfaces | Always steam first to soften and dissolve residues |
| Leaving door closed after cleaning | Traps moisture, promotes mold growth in door seal | Air dry with door open for 10–15 minutes |
| Cleaning with wet sponge | Pushes water into vents and electronic components | Use barely-damp microfiber cloth, wrung out well |
| Using plastic containers for steam | Risk of melting, warping, or leaching BPA at sustained high heat | Use glass or ceramic bowls only |
For more on maintaining your kitchen appliances, see our complete kitchen cleaning guide. The same surfactant-free, acid-based cleaning approach used here also applies to other appliances — see our guides on how to clean an oven for overlapping baked-on grease removal, how to clean a refrigerator for a complete appliance cleaning routine, and how to clean a toaster for small kitchen appliance maintenance. The vinegar steam method described here also applies to bathroom fixture cleaning, where the same acid-based chemistry dissolves soap scum and hard water deposits.
Frequently Asked Questions
Q: Can I clean my microwave with just vinegar and water?
A: Yes. White distilled vinegar mixed at a ratio of 2 tablespoons per 1 cup of water is the primary steam cleaning solution. Heat the mixture for 5 minutes on high, then let the steam dwell for 2–3 minutes before wiping clean. This method handles approximately 90% of microwave cleaning needs without any other products. The 5% acetic acid concentration in standard white vinegar provides sufficient cleaning power at this dilution ratio for all common food residues including dried sauces, splattered soups, and melted cheese.
Q: How do I clean a microwave without any cleaning products?
A: The steam method requires only water and vinegar — household staples rather than specialized cleaning products. If you have neither available, heat a damp paper towel in the microwave for 3–4 minutes on high, then immediately wipe the interior surfaces before they cool. The heat and moisture from the steamed paper towel still loosens most dried food through thermal softening, though it is less effective on heavy grease buildup than the vinegar method. A damp cloth wrung out and microwaved for 2 minutes produces a similar effect.
Q: How often should I clean my microwave?
A: Wipe the interior after any significant spill — this takes under 30 seconds and prevents food from baking onto surfaces during subsequent heating cycles. A full steam cleaning should be performed once per week for daily-use microwaves. Microwaves used less frequently can follow a bi-weekly or monthly steam cleaning schedule. The door handle and exterior control panel should be wiped daily as part of general kitchen surface cleaning, since NSF International studies have found that microwave handles rank among the most contaminated kitchen surfaces in typical households.
Q: Why does the steam cleaning method work so well?
A: Steam cleaning works through a chemical reaction called saponification. The acetic acid in vinegar (pH 2.5 at 5% concentration) reacts with alkaline fats and food acids in dried splatter to create water-soluble compounds that dissolve easily. Combined with the thermal energy of steam — which causes molecular agitation and softens dried food bonds — this reaction breaks the adhesion between food particles and the interior surface without requiring physical force. The steam also reaches every surface uniformly, including overhead areas and corners that are difficult to scrub manually.
References
- NSF International. (2013). NSF International Conducts Germ Study, Identifies Kitchen as Germiest Place in the House. NSF.org.
- U.S. Department of Agriculture, Food Safety and Inspection Service. (2023). Cleanliness Helps Prevent Foodborne Illness. USDA.gov.
- U.S. Environmental Protection Agency. (2024). Safer Choice Standard for Cleaning Products. EPA.gov.
- Centers for Disease Control and Prevention. (2023). Food Safety: Clean. CDC.gov.


