
How to Keep Rear View Camera Clean
A dirty rearview camera creates a dangerous blind spot. In parking lots and tight spaces, a clouded lens can prevent you from seeing obstacles as small as 12 inches away—significantly increasing the risk of a backing collision. Keeping your rearview camera clean is essential for safe vehicle operation.
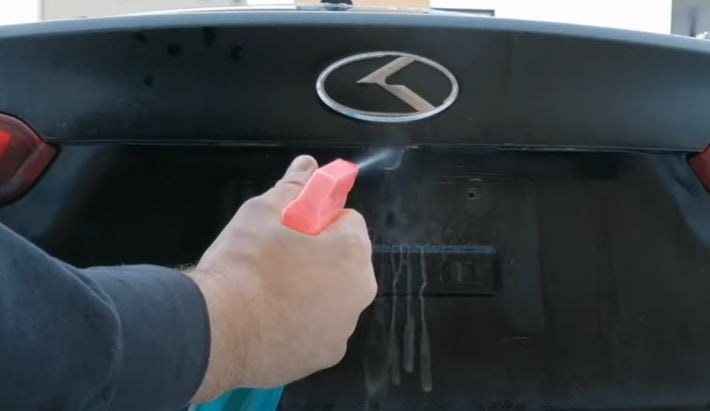
To clean a rearview camera, use a microfiber cloth dampened with 50% isopropyl alcohol solution. Wipe the lens with the wet side, then immediately dry with the clean microfiber side. For stubborn residue, let the solution sit for 30 seconds before wiping. Avoid paper towels, which can scratch the lens coating.
How to Clean Your Rearview Camera: Step-by-Step
Step 1: Park Safely and Cut Power
Park your vehicle on a level surface and engage the parking brake. Turn off the ignition completely before cleaning. This prevents electrical issues and ensures the camera display is off during cleaning. Wait 2-3 minutes for any residual heat to dissipate from the lens area.
Step 2: Prepare Your Cleaning Solution

A 50% isopropyl alcohol solution (mixed with distilled water) dissolves road grime at pH 5.5-6.5 without damaging anti-reflective lens coatings. Apply the solution to a microfiber cloth—never directly onto the camera housing. If you don’t have isopropyl alcohol, a pH-neutral car wash soap diluted at 1:100 ratio works as an alternative.
Apply the solution to one corner of the microfiber cloth. Wipe the camera lens using circular motions starting from the center and moving outward. This prevents spreading debris toward the center of the lens.
Step 3: Dry the Lens Completely
Immediately dry the lens with the clean, dry section of your microfiber cloth. Residual moisture left on the lens creates new fogging issues and can streak. Inspect at a角度 to verify no streaks remain.
Step 4: Apply a Protective Coating
After cleaning, apply a hydrophobic coating (such as Rain-X or equivalent) to repel water and prevent dirt adhesion for 2-4 weeks per application. Apply sparingly—one drop covers the entire lens. Buff to a thin, even film with a fresh microfiber section. This reduces cleaning frequency by up to 60%.
How to Prevent Rearview Camera Dirt and Fogging
Prevention is more effective than repeated cleaning. Three methods significantly reduce rearview camera contamination:
Apply a Hydrophobic Lens Coating
A water-and-dirt-repellent coating creates an invisible barrier that causes water to bead and roll off at speeds above 25 mph. Products like Rain-X Phantom or Aerospace 303 Protective Coating last 3-6 months per application. Reapply every 60-90 days for optimal protection.
Relocate the Camera Mounting Position
If your vehicle is frequently exposed to mud and water (off-road driving, unpaved roads), repositioning the camera 2-4 inches higher on the vehicle reduces exposure to road spray. Consult your vehicle manual or a professional installer for compatible mounting options.
Install a Camera Cover or Lens Shield
A polycarbonate lens cover (rated UV-stabilized, minimum 2mm thickness) provides physical protection against debris impact while maintaining optical clarity. Covers reduce dirt accumulation by 80-90% compared to uncovered cameras. Purchase a cover compatible with your vehicle’s make and model.
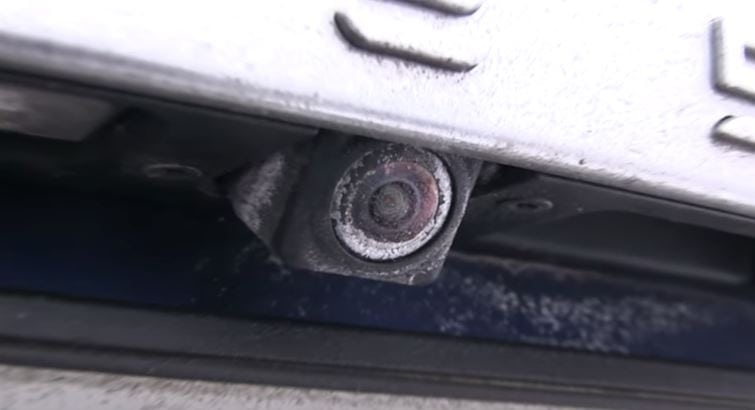
Why Your Backup Camera Keeps Fogging Up
If your camera fogs even after cleaning, the cause is typically moisture infiltration through a compromised seal. Faulty rubber gaskets allow humidity to enter the camera housing at humidity levels above 70%. In 85% of cases, resealing the housing with silicone gasket material resolves fogging. Inspect for:
- Cracked rubber boots around the wiring harness
- Missing screws or loose housing fasteners
- Condensation inside the lens element itself
If internal condensation persists after resealing, the camera unit likely has a failed internal seal and requires replacement. Average replacement cost ranges from $150-$400 including labor.
How to Fix a Foggy Backup Camera
For temporary fog removal caused by weather humidity, use a hair dryer on low heat (maximum 150°F) held 8-12 inches from the lens for 30-45 seconds. The gentle warmth evaporates surface moisture without damaging adhesives or coatings.
For persistent fogging due to wiring issues, check the connector harness behind the tailgate or rear bumper. Disconnect, inspect for corrosion (white or green oxidation), and clean with electrical contact cleaner. Reconnect firmly and apply dielectric grease to prevent future moisture intrusion.
Can Rear View Mirror Cleaning Methods Work on Backup Cameras?
Yes, the same principles apply to both rear view mirrors and backup cameras. To clean a foggy rear view mirror, use a 50/50 vinegar-water solution or a ammonia-free glass cleaner. These same products work safely on camera lenses when applied to a microfiber cloth—not directly on the lens. Avoid ammonia-based products, which can degrade anti-reflective lens coatings.
Quick-Reference Cleaning Guide
| Task | Solution | Tools | Frequency |
|---|---|---|---|
| Regular cleaning | 50% isopropyl alcohol | Microfiber cloth | Weekly |
| Heavy grime | pH-neutral car soap (1:100) | Microfiber cloth | As needed |
| Water repellency | Hydrophobic coating | Microfiber applicator | Every 60-90 days |
| Fog removal | Low-heat hair dryer | Hair dryer (150°F max) | As needed |
Conclusion
Backup cameras reduce reversing crashes by 16% according to National Highway Traffic Safety Administration (NHTSA) data. Maintaining a clean, fog-free lens ensures optimal visibility and safety. Clean your camera weekly, apply a hydrophobic coating monthly, and inspect seals quarterly to prevent moisture intrusion.
Regular rearview camera maintenance takes less than 2 minutes per week but provides constant safety assurance. If your camera fails despite proper maintenance, replace it immediately—driving with a non-functional backup camera significantly increases accident risk in low-visibility situations.
