
The Dyson Vacuum Cord Not Retracting – How to Solve It!

When the Dyson vacuum cord stops retracting, the automatic rewind mechanism has failed. This repair guide covers the two quick fixes that resolve most cord retraction failures, plus complete instructions for replacing the faulty cable rewind assembly.
So, when you discover your Dyson vacuum cord not retracting, I can imagine how frustrating it can get.
Now, don’t panic. This is something you can fix with a little effort most of the time. First, make sure you are doing the right thing to trigger the rewind action.
If the Dyson vacuum cord is not retracting, pull out the cord until the red tape marker is visible. Press the rewind button firmly—you hear a distinct click when the mechanism engages. The cord retracts automatically once the mechanism is properly triggered.
Perhaps, you tried your best and it’s still not working. Well, let’s try something different then, keep reading…
Dyson Vacuum Cord Not Retracting: Step-by-Step Repair Guide
As soon as you discover the cord not being able to retract, finding an appropriate repair is the next thing to do. Often people decide to continue with the damaged cord. This decision poses serious risks.
A damaged vacuum power cord causes an estimated 18% of appliance-related electrical fires in residential settings. Frayed wires, missing prongs, or cuts in the cord insulation expose live conductors. These conditions create sparks, short circuits, and electrocution risks. According to the National Electrical Code (NEC), all flexible power cords must meet UL 62 standards for thermal resistance and current capacity.
Now back to the specific damage I’m covering today, about the cord retraction not working. To start any repair with the cord, you must take the power cord out of the wall outlet so that it is not connected to electricity.
Then try the two simple solutions given below.
Tug Cord to Re-Engage the Winding Mechanism

A few inches from the vacuum cleaner hole are where you want to grab the cord and then sharply tug on it.
After that, release the cord and notice if it is engaging with the winding mechanism. If it does, you have solved the minor issue the cord was having.
Clean the Cord Holding Hole
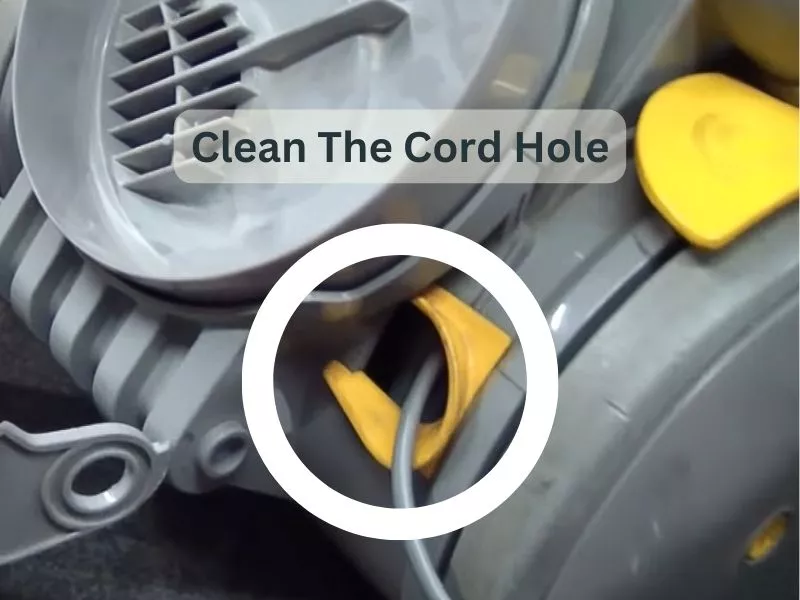
If the previous step did not help, bring a flashlight, and start observing the hole that takes the cord. Look for any dirt, debris, or contaminant that has accumulated inside.
Use your fingers to get rid of any loose debris. You can also try placing some double-sided tape on a pencil’s eraser end. Insert this DIY tool into the cord aperture and twist to collect all accumulated dirt inside.
Sometimes the cord aperture is too soiled to clean without removing the panel. In that case, use a Phillips screwdriver to unscrew the panel and then access the winding spool in charge of wrapping the cord.
The cord may be simply snagged against a corner inside, pushing it to the right spot. Use a compatible lubricating spray for the spool after you deep clean the surrounding area.
If the screws or panel are stripped or damaged, replace those components. After cleaning, try the previous tugging method once again and check if it engages this time.
If none of these solutions work, the cable rewind assembly itself is faulty and requires replacement.
Dyson Cable Rewind Assembly Replacement
You may think of a complete Dyson power cord replacement but changing the faulty rewind mechanism is sufficient in most cases. You need to make sure the appliance is disconnected from power. Along with the new cable rewind, you also need a screwdriver.
7 Steps to Replace the Cord Cable Rewind
Remove the bin, filter, and cyclone top to access the cable rewind. After removing the external parts, separate the main body carefully.
Use the screwdriver to remove all holding screws. These screws are typically located under both wheels and the canister behind the slope.
Each wheel has two screws. Pull back the wheel and use the Torx head screwdriver to remove the screws.
The cable rewind is inside the lower motor assembly. Remove the upper motor assembly to have better access. Removing the wheels may help here.
Unclip the cable entry and then remove the old cable rewind. Install the new cable rewind in its place. A few wires will need uncoupling from the old rewind to later connect with the wires of the new rewind.
Quick Tip
Take a picture before uncoupling the old cable rewind so you have a reference for proper wiring connections.
Feed the cable through the gap on the back and refit the cable entry by clipping it in place. Once the plug is positioned, set the cable rewind in the correct position. Slot the lip of the new rewind into position to achieve proper alignment.
Place the rewind on the lower motor cover and complete the wiring according to the picture taken of the old wiring. Reinstall the upper motor cover. Reinstall the wheels and screw down everything securely.
Safety Warning Signs: When to Replace Your Vacuum Cord Immediately
Inspect your vacuum power cord regularly for these warning signs that indicate immediate replacement is necessary:
- Frayed or exposed wires — The copper conductors are visible through the cord insulation
- Cracked or melting insulation — The cord casing shows signs of heat damage, discoloration, or brittleness
- Missing or loose prongs — The grounding or live prongs on the plug are damaged, missing, or wobble
- Burn marks or scorching — Dark spots or char marks near the plug or cord entry points
- Intermittent power — The vacuum cuts out intermittently during use, indicating loose internal connections
Wrapping Up
And that’s an overview of what you need to do when the Dyson vacuum cord not retracting. It is always a great idea to try fixing the problem yourself first before taking it to a professional.
However, if the issue seems like something severe, or could cause damage to other components of the Dyson vacuum, then your best bet is to contact the service center or hire a local expert.
References
- Wikipedia. (2024). Vacuum Cleaner. Wikimedia Foundation.
- Wikipedia. (2024). Extension Cord. Wikimedia Foundation.


